Dependency Injection (DI) とは、オブジェクトに必要な依存関係を外から注入する設計パターンです。 本記事ではiOSアプリの実装をテーマに、DIがなぜ必要なのか、さらにはDI Containerとは何を解決するためにあるのかについて具体的な実装例をもとに解説します。
※ 本記事は iOS Test Night #12 にて発表した内容を書き起こしたものとなっております。
Dependency Injection
Dependency Injectionについて説明するにあたって、ログインフローの実装を具体例として取り上げます。
その際、各構成要素はGoogleの公開しているAndroidアプリを開発する上でのガイドラインである Guide to app architecture に則って設計します。
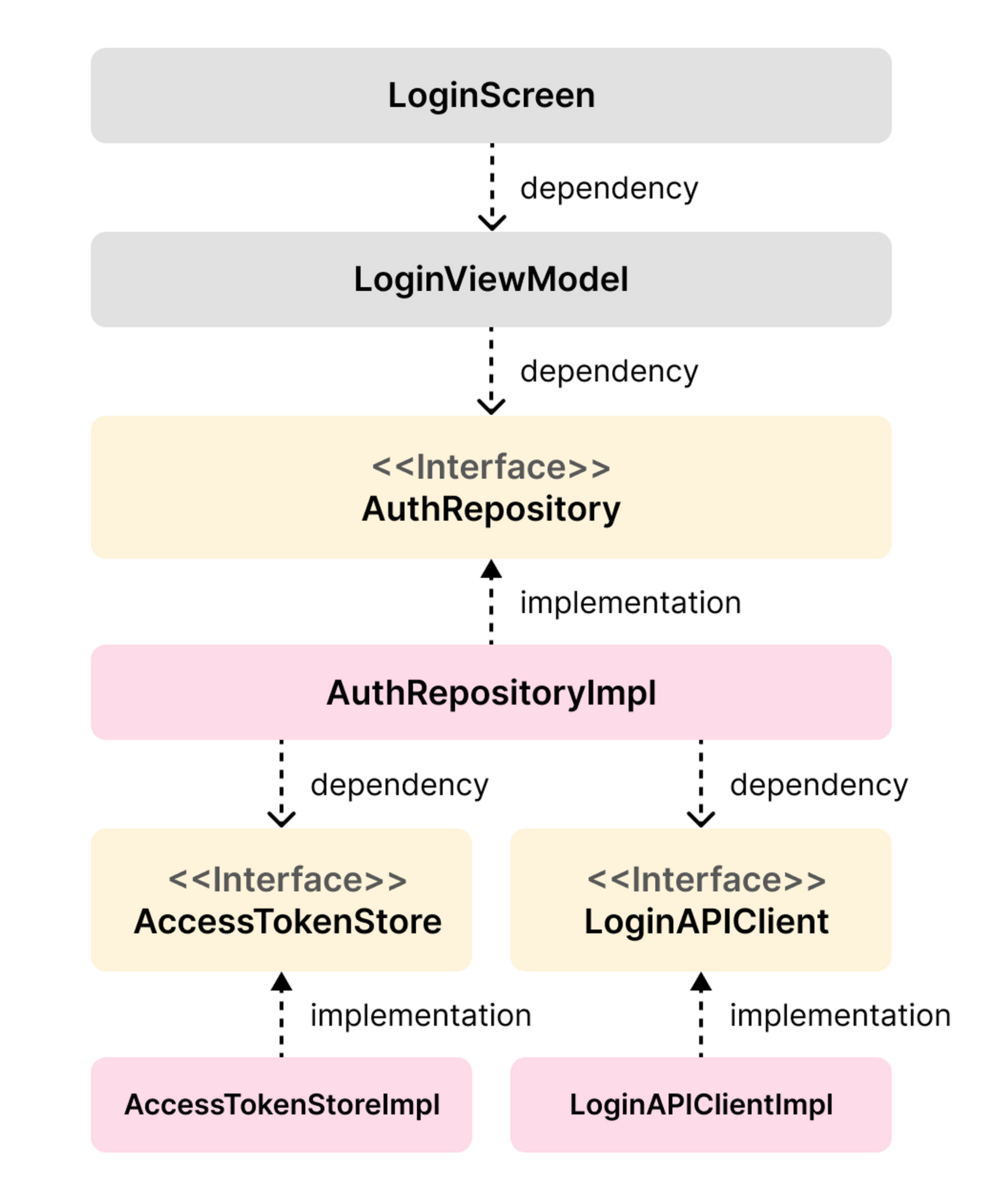
構成要素とそれぞれの依存関係は以下のようになります。
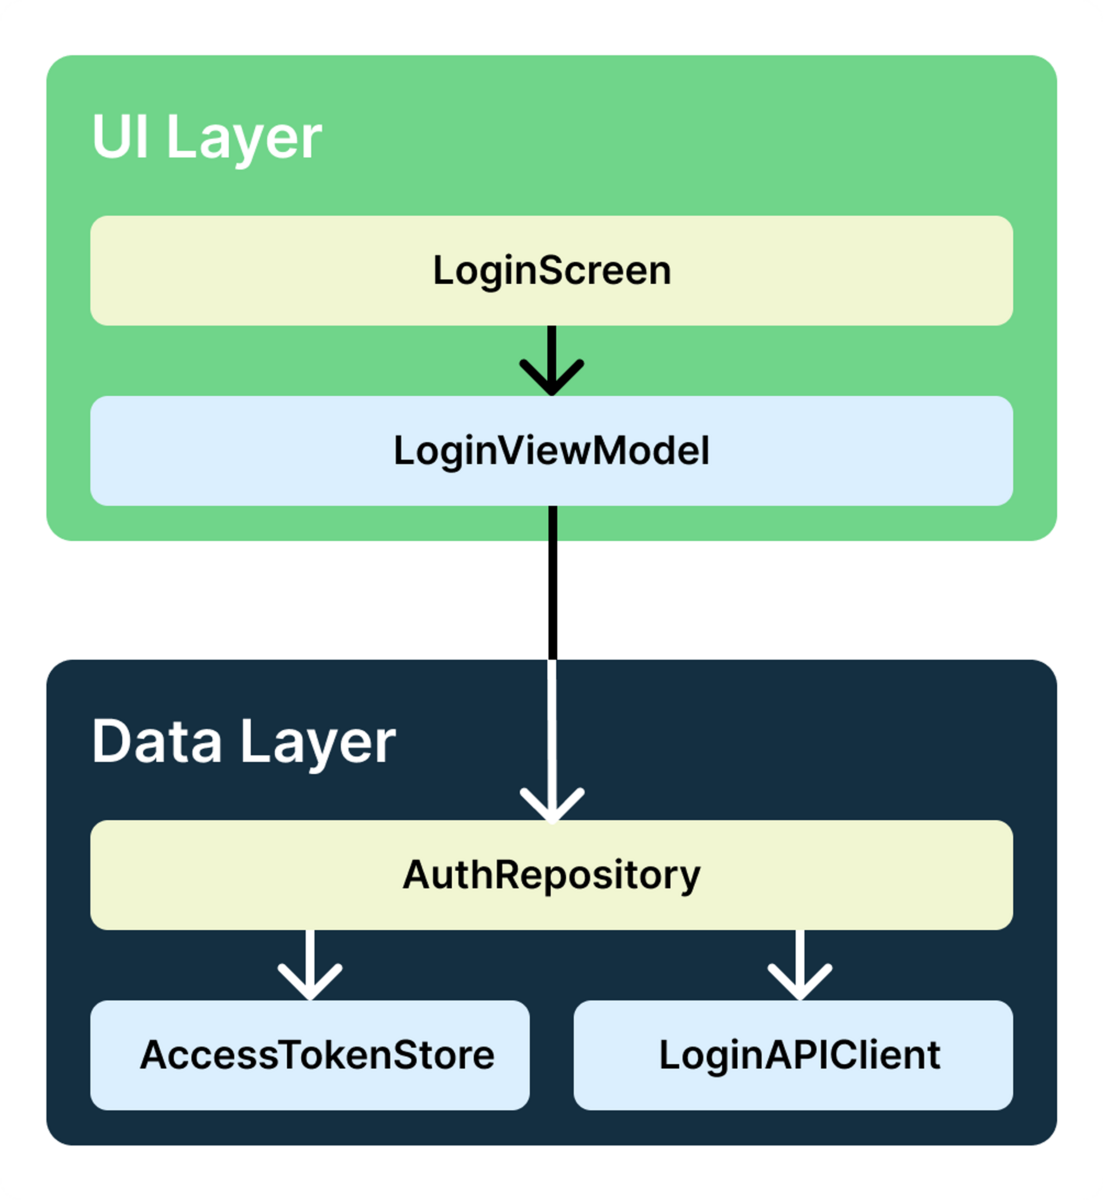
LoginScreen は LoginViewModel に依存し、 LoginViewModel はさらに AuthRepository へ依存します。そして、 AuthRepository は LoginAPIClient と AccessTokenStore へ依存します。
ログインフローにおける処理の流れは以下のようになります。
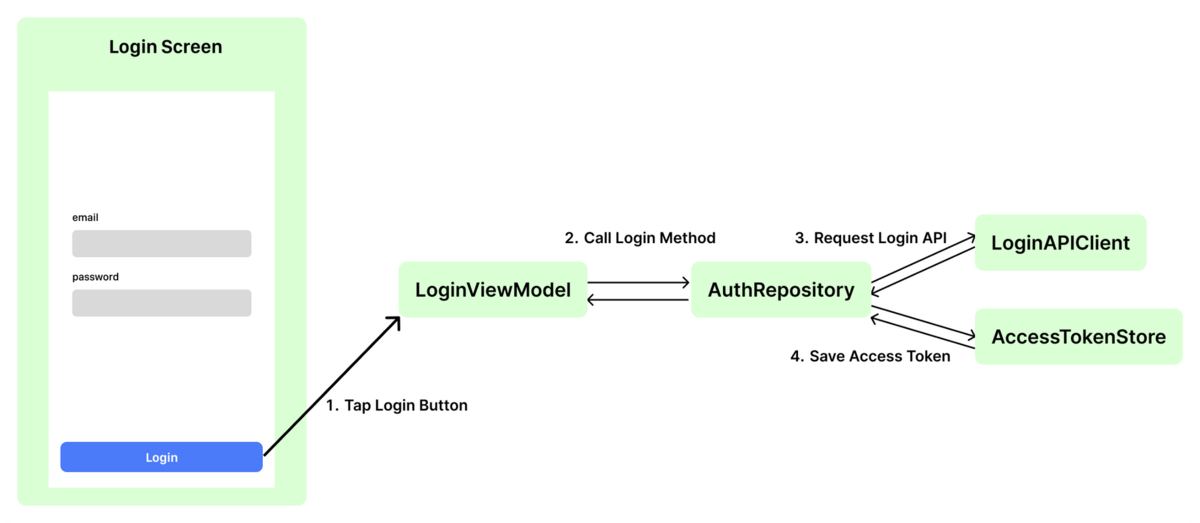
ログイン画面のLoginボタンをタップすると LoginScreen から LoginViewModel へイベントが伝播し、 LoginViewModel は AuthRepository のloginメソッドを呼び出します。 AuthRepository では LoginAPIClient 経由でAPIリクエストを投げて、レスポンスから得られたアクセストークンを AccessTokenStore へ保存します。
依存を内部で初期化する書き方
これらの各要素に必要な依存関係を、それぞれの要素の内部で初期化するとしましょう。 実装としては以下のようになります。
struct LoginScreen: View {
  private let viewModel = LoginViewModel()

  var body: some View {
    ...
    Button(
        action: {
            Task { await viewModel.onLoginButtonTapped() }
        },
        label: {
            ...
        }
    )
    ...
  }
}

@Observable
@MainActor
final class LoginViewModel {
    ...
    func onLoginButtonTapped() async {
          let authRepository = AuthRepository()
        do {
              try await authRepository.login(email: email, password: password)
            ...
        } catch { ... }
      }
    ...
}

final class AuthRepository {
    func login(email: String, password: String) async throws {
          let loginAPIClient = LoginAPIClient()
        let response = try await loginAPIClient.login(email: email, password: password)
          let accessTokenStore = AccessTokenStore()
          accessTokenStore.save(response.accessToken)
      }
}

final class LoginAPIClient { ... }

final struct AccessTokenStore { ... }
このような内部で必要な依存を初期化してしまう書き方には、 テストやデモアプリ実行時に依存を置き換えられない という課題があります。
テスト時に実際にAPIリクエストが飛んでしまうと柔軟なテストケースに対応することが難しく、また実行結果が不安定になってしまいます。 APIリクエスト部分をスタブに置き換えてテストは実行したいところです。
デモアプリでは本番データを参照させずに、デモ用のデータを返す実装に置き換えて実行できると良いでしょう。
環境に応じて依存を置き換えられるようにするためには、 依存性逆転の原則 に従って実装する必要があります。 依存性逆転の法則では以下の二つのルールが提唱されています。
・上位モジュールはいかなるものも下位モジュールから持ち込んではならない。双方とも抽象(例としてインターフェース)に依存するべきである ・抽象は詳細に依存してはならない。詳細(具象的な実装内容)が抽象に依存するべきである
(https://ja.wikipedia.org/wiki/依存性逆転の原則 より引用)
少し抽象的な表現でわかりづらいところもあるかと思いますので、具体的な実装例をもとに説明していきます。
依存性逆転の原則に従った書き方
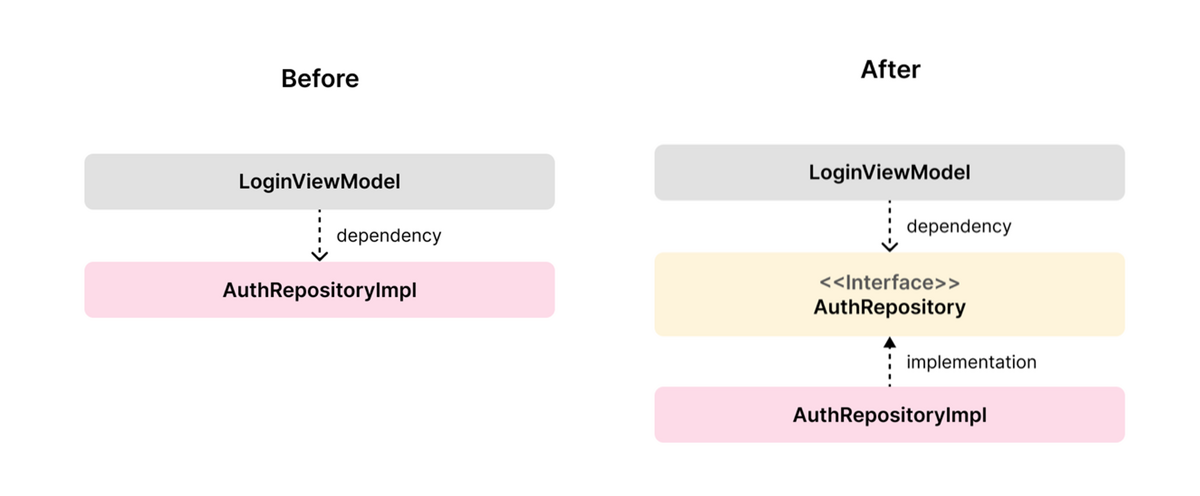
まずは各要素の抽象を表すインターフェース、Swiftにおけるprotocol、を定義してprotocolに準拠した実装を追加します。
protocol AuthRepository {
    func login(email: String, password: String) async throws
}
final class DefaultAuthRepository: AuthRepository {
    func login(email: String, password: String) async throws { ... }
}
次に、各要素において必要となる依存をイニシャライザ引数でprotocolとして受け取るようにします。
final class LoginViewModel {
    private let authRepository: AuthRepository

    init(authRepository: AuthRepository) {
        self.authRepository = authRepository
    }
    ...
}
ここまでで、各要素は抽象に対して依存し、外側から任意の実装を注入することが可能となりました。 依存の矢印が逆転し、上位, 下位のモジュール双方が抽象に対して依存するようになったことがわかるかと思います。これが依存性逆転の原則に従った実装です。
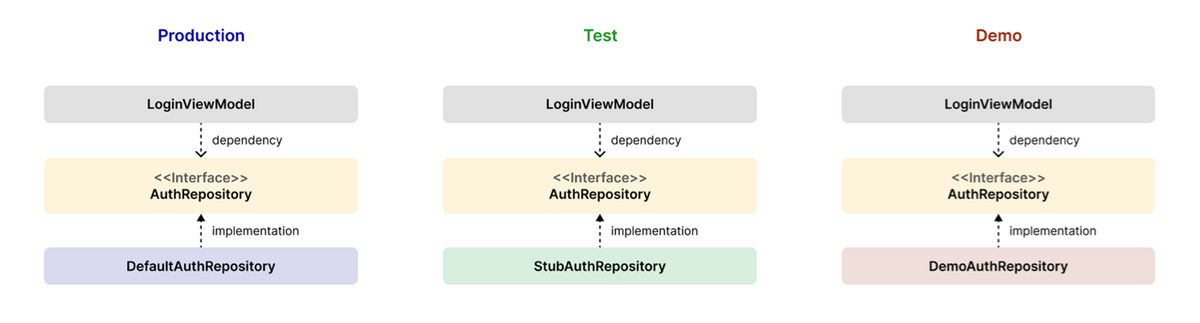
これにより、本番環境では本番用の実装を、テストではスタブの実装を、デモアプリではデモ用のデータを返す実装を差し替えて実行することができるようになりました。
このように、抽象に対して依存するように実装を注入するパターンを、依存性の注入、Dependency Injectionと呼びます。 以降、Dependency Injectionは省略してDIと呼ぶこととします。
DI Containerの基本
DI可能な状態にしたところで、ログインフローへのエントリーポイントとなる LoginScreen では、すべての依存関係が含まれる LoginViewModel を初期化する必要があります。
struct LoginScreen: View {
  private let viewModel: LoginViewModel

  init() {
    let loginAPIClient = DefaultLoginAPIClient()
    let accessTokenStore = DefaultAccessTokenStore()
    let authRepository = DefaultAuthRepository(
        loginAPIClient: loginAPIClient,
        accessTokenStore: accessTokenStore
    )

    self.viewModel = LoginViewModel(
        authRepository: authRepository
    )
  }
  ...
}
しかし、この依存関係の解決方法には次のような課題があります。
1. ボイラープレートコードが多い
- コードの複数箇所で
AuthRepositoryを初期化する場合は、コードが重複してしまいます。 - 複数人で開発する際に、依存が増えるたびに修正する必要のあるファイル数が増え、コンフリクトの発生率が高まります。
- 依存関係は順番に宣言する必要があります。作成するには、
LoginViewModelの前にAuthRepositoryを初期化する必要があります。
2. インスタンスの再利用が困難
- 複数の機能で
AuthRepositoryのインスタンスを再利用する場合は、シングルトンパターンに従う必要があります。 すべてのテストが同じシングルトンインスタンスを共有するため、シングルトンパターンによりテストはより困難になります。
この二つの課題を解決するアプローチとしてDI Containerというパターンがあります。
DI Containerとは、登録された依存を返してくれるコンテナクラスです。
例えば、DI Containerに AuthRepository protocolに対応する実装である DefaultAuthRepository を登録しておけば、アプリケーションのどこからでもDI Containerから AuthRepository の実装を取得できます。

ログインフローで必要となる依存を登録したDI Containerの実装例は以下のようになります。
class Container {
    var loginAPIClient: LoginAPIClient {
        DefaultLoginAPIClient()
    }
    var accessTokenStore: AccessTokenStore {
        DefaultAccessTokenStore()
    }
    var authRepository: AuthRepository {
        DefaultAuthRepository(
            loginAPIClient: loginAPIClient,
            accessTokenStore: accessTokenStore
        )
    }
}
これにより、毎回必要な依存をかき集めて初期化していく代わりに、DI Containerから必要な依存を取り出すだけで済むため、ボイラープレートが削減されます。
さらに、例えば AuthRepository のインスタンスをアプリケーション全体で再利用する場合は、computed propertyで毎回新しいインスタンスを返しているところをstored propertyに変更して一意なインスタンスが返るように変更するだけでOKです。
class Container {
     ...
-    var authRepository: AuthRepository {
+    let authRepository: AuthRepository =
         DefaultAuthRepository(
             loginAPIClient: loginAPIClient,
             accessTokenStore: accessTokenStore
         )
-    }
 }
このコンテナで管理する依存関係はアプリ全体で使用されるため、すべての画面が使用できる共通の場所にて初期化し、子Viewへ配っていきます。
SwiftUIで書かれたiOSアプリでは App に該当します。
@main
struct SampleApp: App {
    let container = Container()

    var body: some Scene {
        WindowGroup {
            AppScreen(container: container)
        }
    }
}
Daggerに学ぶ依存のライフタイム管理
再利用したい依存のライフタイムはアプリケーションのライフタイムと必ずしも同じとは限りません。 ユーザーがログインしている間のみに再利用したい依存や、複数アカウントを切り替えたタイミングで破棄したい依存もあるでしょう。
このような任意のライフタイムごとに依存を管理する機能として、Daggerが参考になります。 Daggerとは、Googleの提供しているAndroidのアプリを開発する上で依存関係の注入をサポートするDI Containerのライブラリです。
Daggerの特徴として、Componentという概念があります。 Componentは依存をグルーピングしたものであり、依存の受け渡しとその同一生の保証を役割として担います。
そしてこのComponentはツリー構造を持ちます。 子Componentは親より短いライフタイムを持ち、子Componentは親の依存の受け渡しも担います。
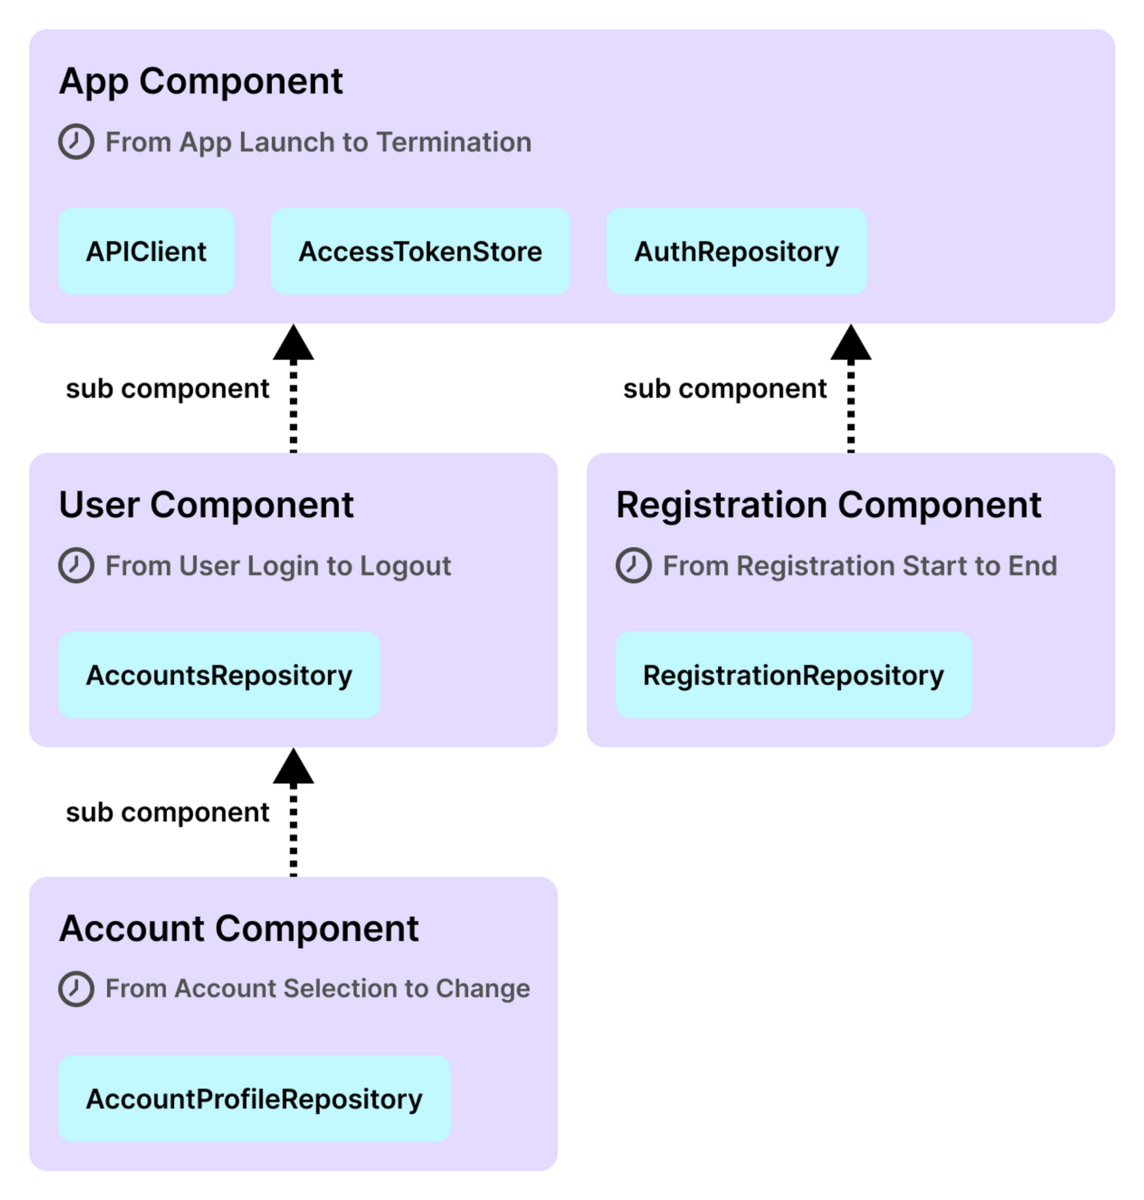
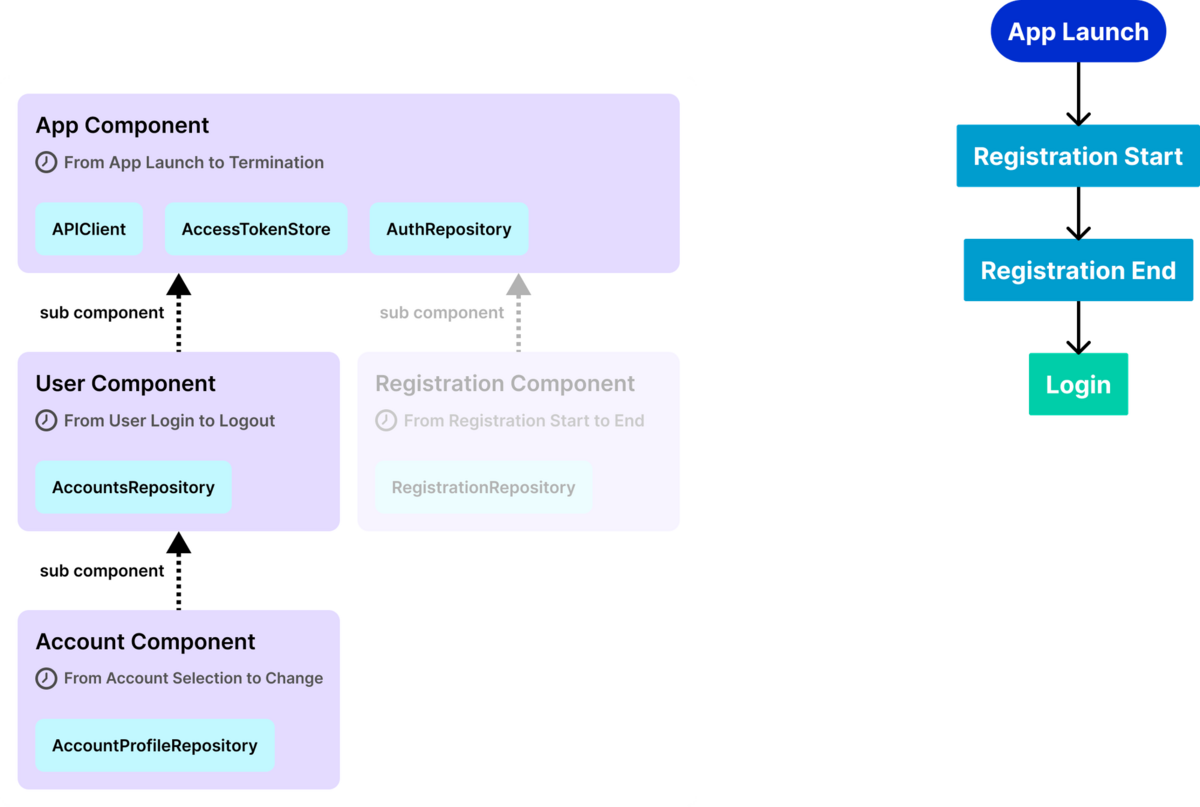
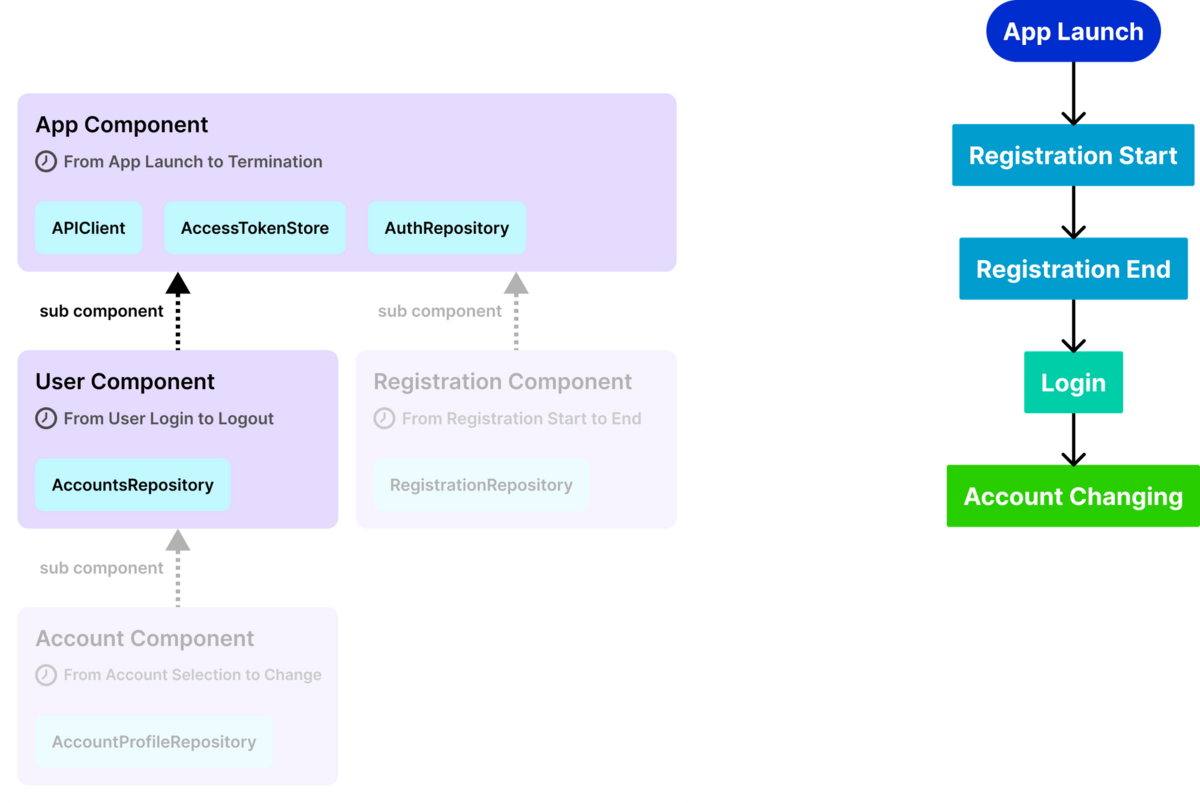
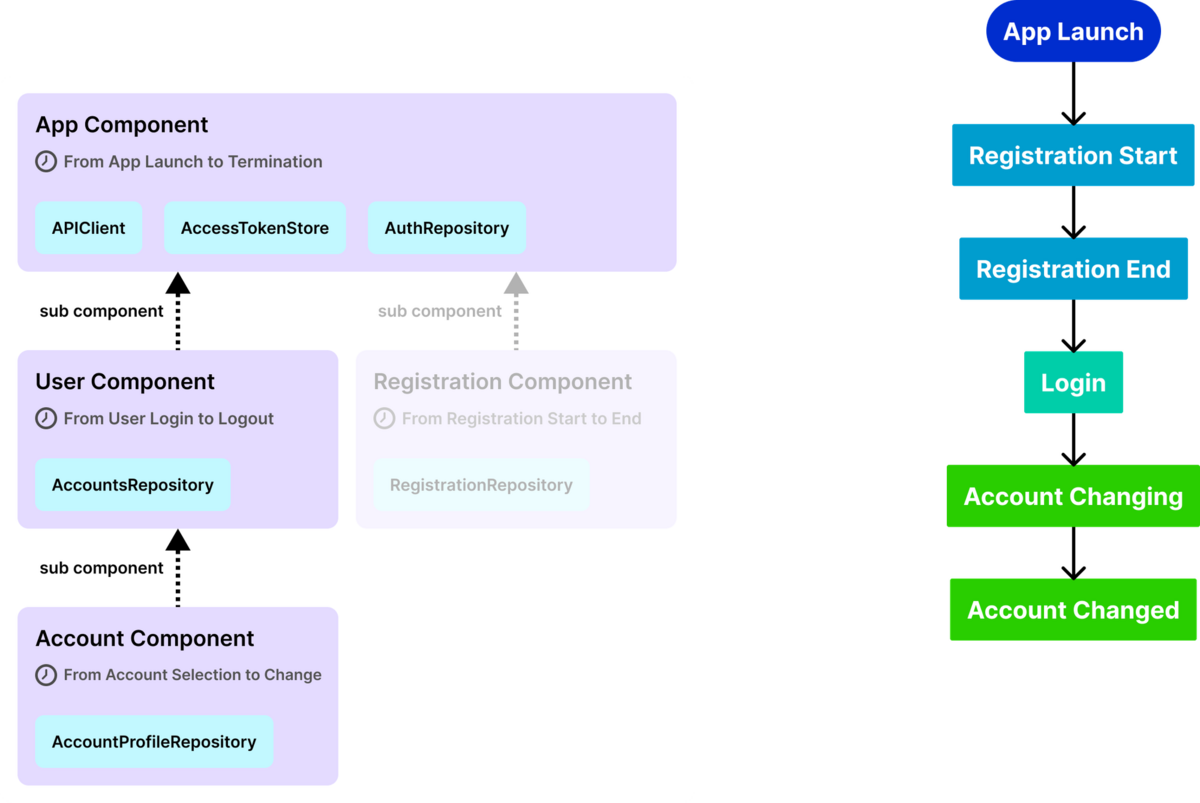
例えば、Daggerにて以下の4種類のComponentを定義するとします。
- App Component: アプリの起動から終了までのライフタイム
- Registration Component: 会員登録開始から完了までのライフタイム
- User Component: ログイン後からログアウトまでのライフタイム
- Account Component: アカウント選択中から切り替えまでのライフタイム
それぞれの親子関係は以下のようになります。
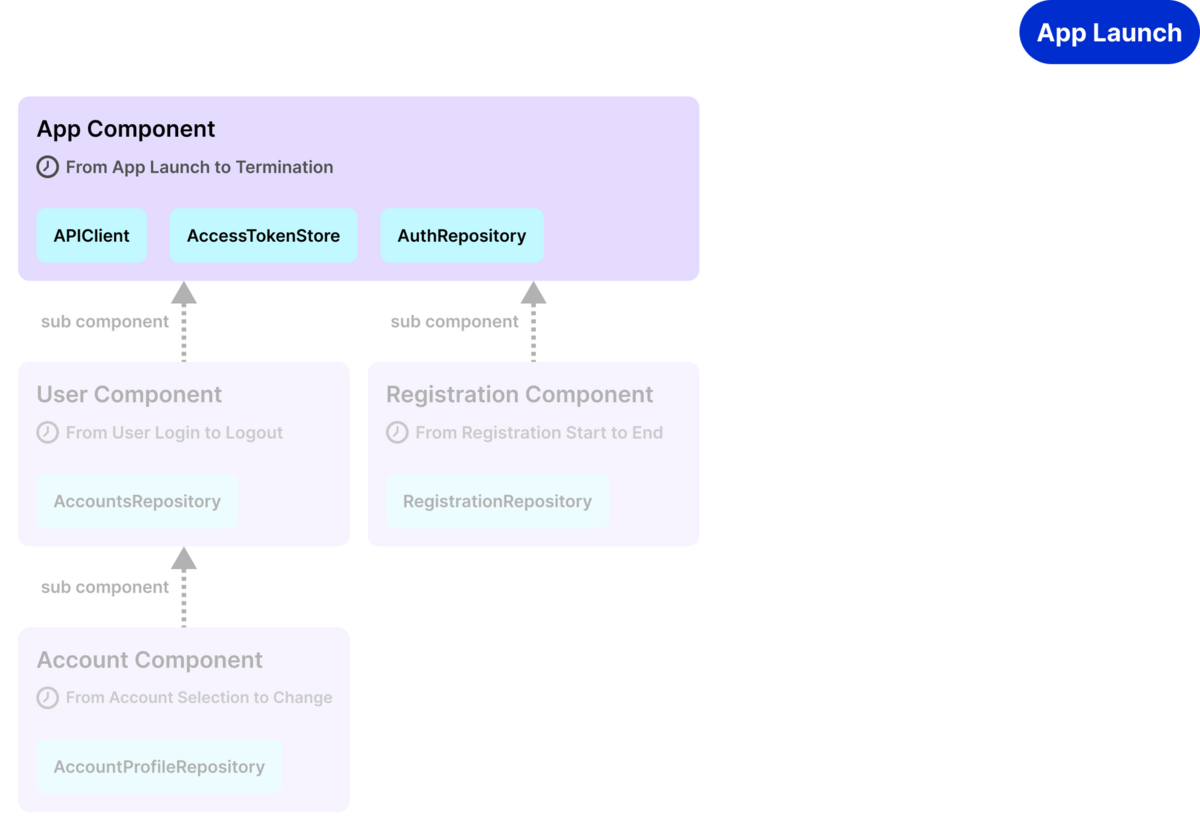
こちらを例にComponentによる依存のライフタイム管理について説明します。
まず、App Componentはアプリの起動直後に生成されます。
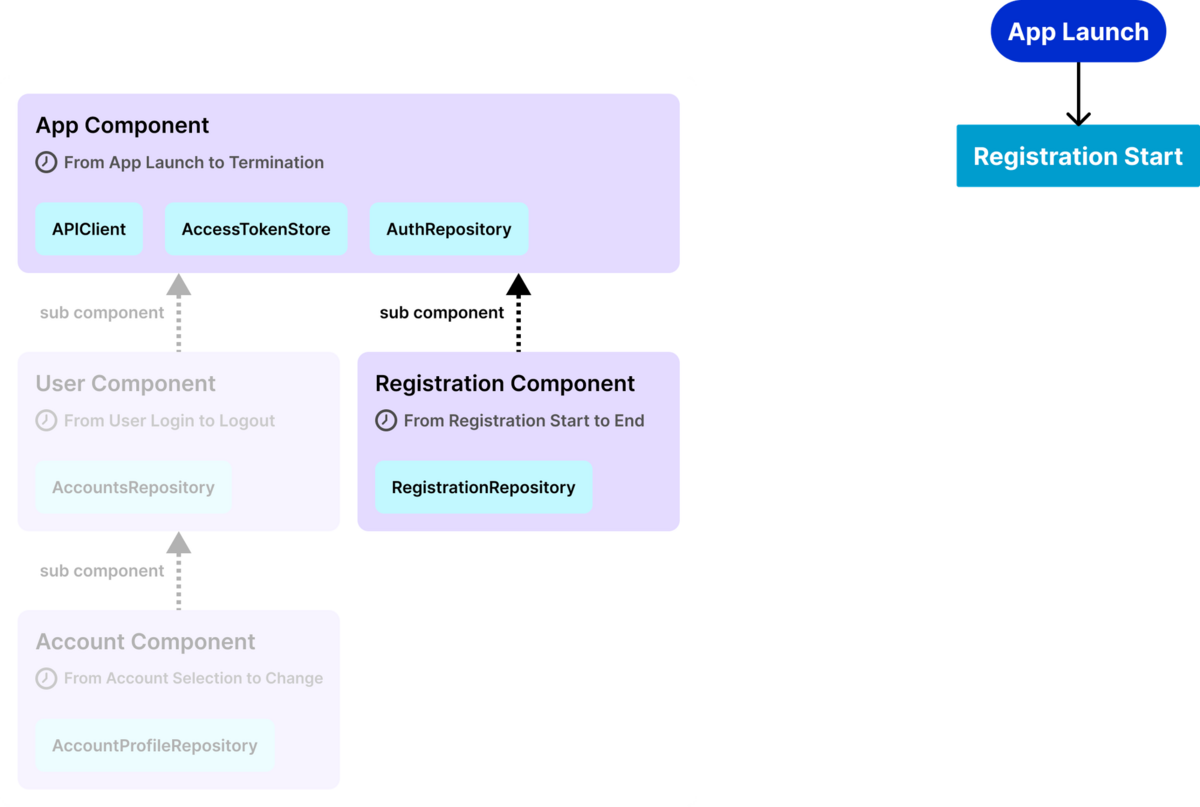
会員登録のフローに入るとRegistration Componentが生成されます。
会員登録フローが完了するとRegistration Componentは破棄され、その後ログインを経てUserComponentおよびAccount Componentが生成されます。
複数アカウントがある場合、アカウントを切り替えるとAccount Componentが破棄されます。
アカウントの切り替えが完了すると、新しいAccount Componentが生成されます。
ログアウトすると、UserComponentおよびAccount Componentが破棄されます。
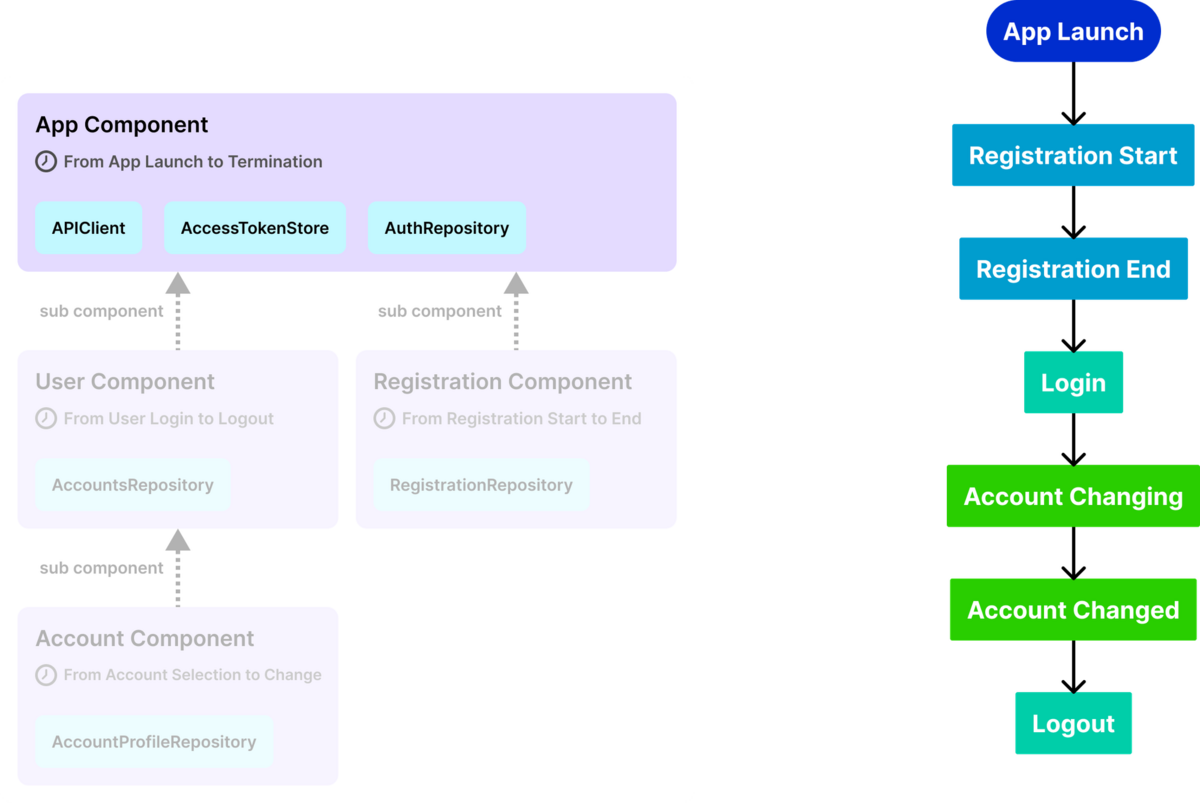
アプリケーションが終了すると、App Componentが破棄されます。
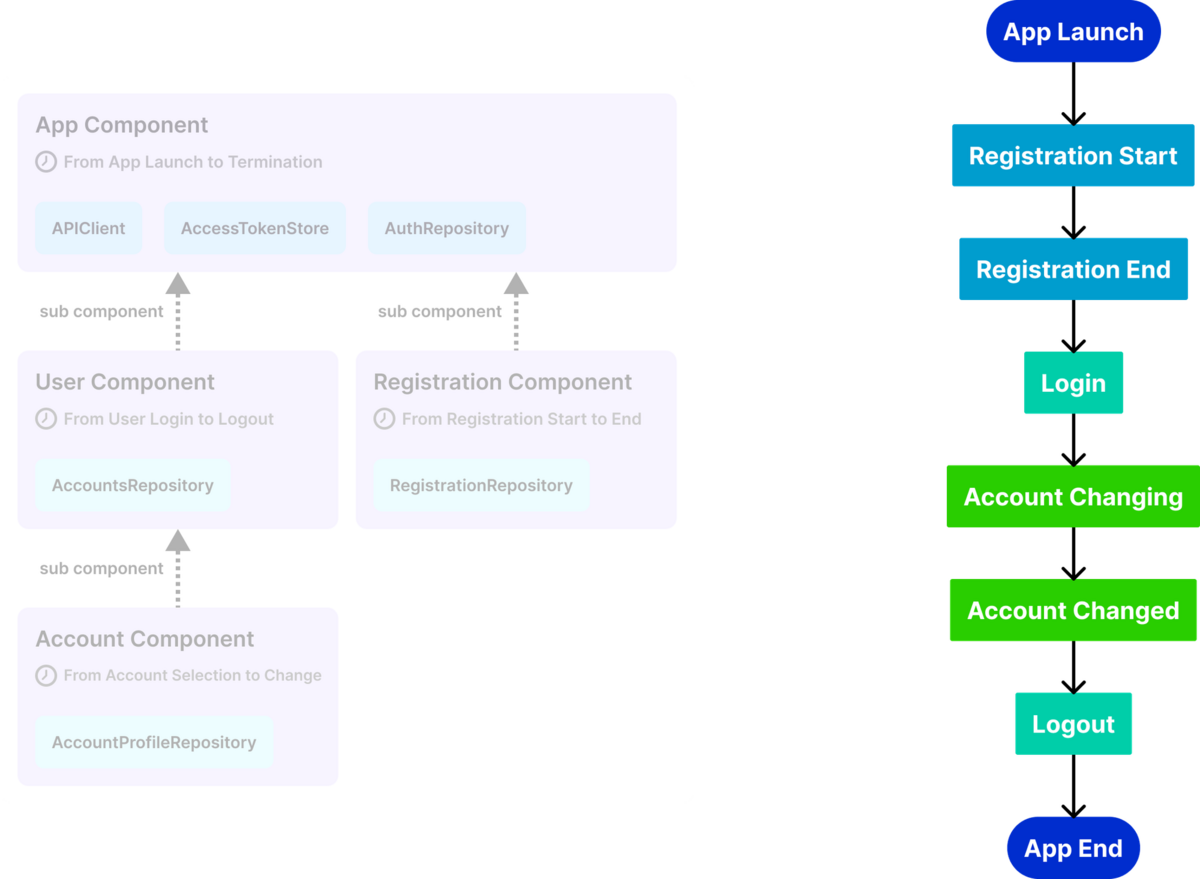
これがDaggerにおけるComponentによる依存のライフタイム管理の機能の概要です。
例えばSlackのAndroidアプリでは、以下の3つのライフタイムに対応するComponentが用意されています。
- App: アプリケーション全体でのSingleton
- Org: 複数のWorkspaceを内包するそれぞれのOrganizationに対応するライフタイム
- User: それぞれのWorkspaceに対応するライフタイム
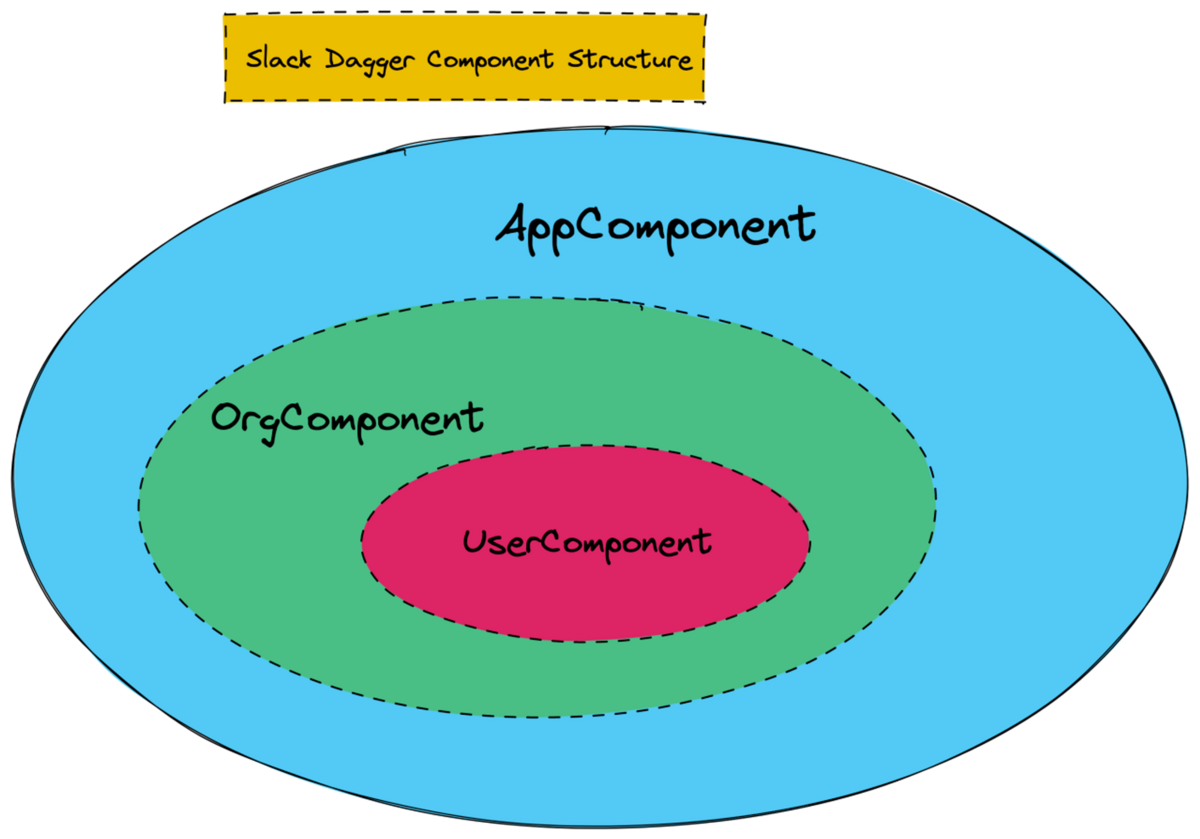
参考: Extending Anvil for Fun and Profit | Engineering at Slack
この構造はSlackアプリのUIの構造をご存知の方にとっては理解しやすいかと思います。
さて、ここまででDaggerを例にDI Containerによる依存のライフタイム管理の概念について説明しました。 最後に、このようなDI Containerの要件を満たす具体的な実装について、SwiftUIを用いたiOSアプリの実装を例にご紹介します。
SwiftUIアプリにおけるDI Containerの実装例
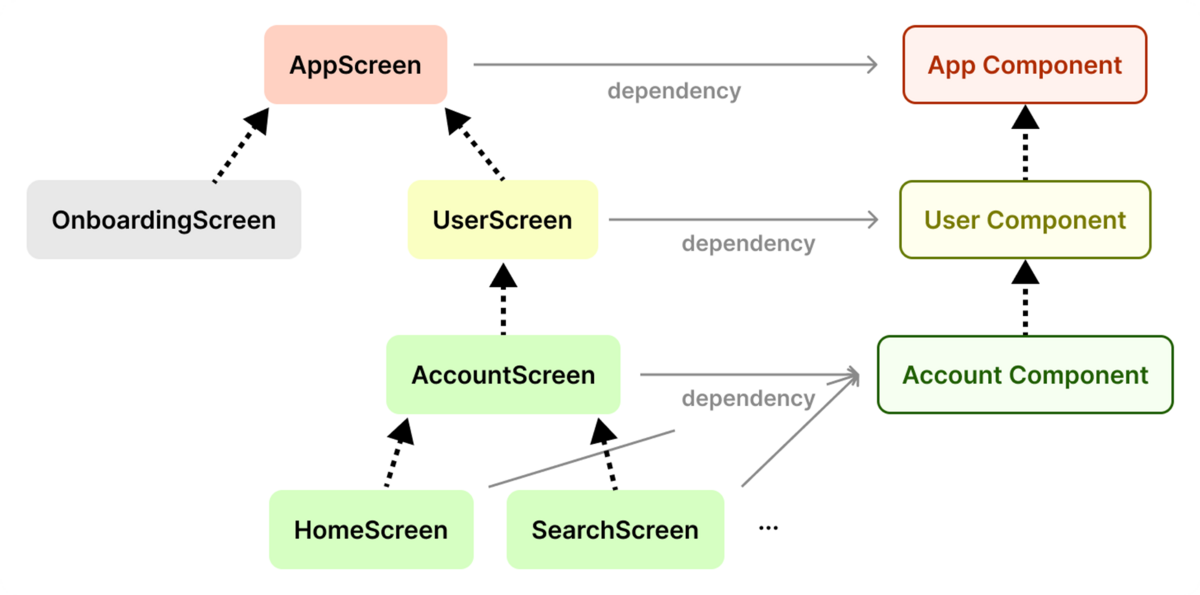
SwiftUIはiOSアプリ等の開発で使用される宣言的UIフレームワークです。 宣言されたViewには親子関係があり、ツリー構造が生まれます。
Viewのツリー構造とComponentのツリー構造をアラインさせることで、ViewとComponentのライフタイムを対応づけることが可能です。 今回はSNSアプリをテーマにSwiftUIアプリにおけるDI Containerの具体的な実装例を示します。
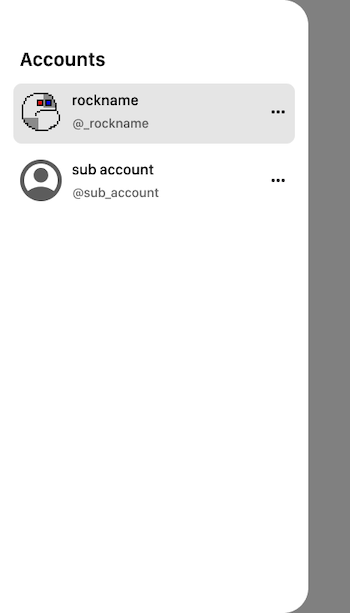
このSNSアプリでは、ユーザーが複数のアカウントを持つことができ、切り替えて利用することが可能です。
ViewとComponentのツリー構造とそれぞれの依存は以下のようになることを想定しています。
DI Containerの実装
まずは、DI ContainerのrootとなるApp Componentを実装し、アプリケーション全体で使用可能な依存を定義していきます。
class AppComponent {
    var apiClient: APIClient {
        DefaultAPIClient()
    }
    var accessTokenStore: AccessTokenStore {
        DefaultAccessTokenStore()
    }
    var currentAccountIDStore: CurrentAccountIDStore {
        DefaultCurrentAccountIDStore()
    }
    let authRepository: AuthRepository =
        DefaultAuthRepository(
            apiClient: apiClient,
            accessTokenStore: accessTokenStore
        )
}
次に、App Componentの子ComponentとなるUser Componentを実装していきます。
User Componentから親の依存を辿れるように、 parent propertyとしてApp Componentを保持します。
class UserComponent {
    let parent: AppComponent

    init(parent: AppComponent) {
        self.parent = parent
    }
}
そして、UserComponentにはログイン後からログアウトまでのライフタイムで使用する依存を登録していきます。
その際、親コンポーネントの依存が必要な場合は parent 経由で取得します。
class UserComponent {
    ...
    let accountsRepository: AccountsRepository =
        DefaultAccountsRepository(apiClient: parent.apiClient)
    let currentAccountRepository: CurrentAccountRepository =
        DefaultCurrentAccountRepository(
            apiClient: parent.apiClient,
            currentAccountIDStore: parent.currentAccountIDStore
        )
}
最後に、User Componentの子ComponentであるAccount Componentを実装します。 選択中のアカウントのライフタイムで使用する依存を登録していきます。
class AccountComponent {
    let parent: UserComponent

    init(parent: UserComponent) {
        self.parent = parent
    }

    let homeTimelineRepository: HomeTimelineRepository =
        DefaultHomeTimelineRepository(
            apiClient: parent.parent.apiClient
        )
    ...
}
このとき、Component内から親の親の依存を取得しようとすると parent.parent.apiClient のように parent を2回辿る必要があります。
Component外からから任意の依存を取得する場合にも、 component.parent.parent.apiClient のように参照する必要があり、同様の問題が発生します。
この問題はSwiftの Dynamic Member Lookup という言語機能を活用することで解決できます。
@dynamicMemberLookup
class UserComponent {
    private let parent: AppComponent
    ...
    subscript<T>(dynamicMember keyPath: KeyPath<AppComponent, T>) -> T {
        parent[keyPath: keyPath]
    }
}

@dynamicMemberLookup
class AccountComponent {
    private let parent: UserComponent
    ...
    subscript<T>(dynamicMember keyPath: KeyPath<UserComponent, T>) -> T {
        parent[keyPath: keyPath]
    }
}
これにより、 parent の持つKeyPathに対して直接アクセスすることが可能となり、Component内では parent のネストは1つに、Component外からは parent を意識せずに依存を取得できるようになります。
class AccountComponent {
     ...
     let homeTimelineRepository: HomeTimelineRepository = DefaultHomeTimelineRepository(
-        apiClient: parent.parent.apiClient
+        apiClient: parent.apiClient
     )
 }

- let apiClient = accountComponent.parent.parent.apiClient
+ let apiClient = accountComponent.apiClient
最後に、親子関係を担保するために親Component側に子Componentのインスタンスを返すメソッドを用意します。
class AppComponent {
    ...
    func makeUserComponent() -> UserComponent {
        UserComponent(parent: self)
    }
}

class UserComponent {
    ...
    func makeAccountComponent() -> AccountComponent {
        AccountComponent(parent: self)
    }
}
ここまでがDI Container側の実装です。
Viewの実装
続いて、View側の実装をしていきます。 用意したComponentを、ライフタイムを一致させたいViewにて初期化してインスタンスを持たせるようにします。
struct SNSApp: App {
    var body: some Scene {
        WindowGroup {
            AppScreen(component: AppComponent())
        }
    }
}

struct AppScreen: View {
    let component: AppComponent
    ...
    var body: some View {
        ...
        UserScreen(component: component.makeUserComponent())
        ...
    }
}

struct UserScreen: View {
    let component: UserComponent
    ...
    var body: some View {
        ...
        AccountScreen(component: component.makeAccountComponent())
        ...
    }
}

struct AccountScreen: View {
    let component: AccountComponent
    ...
}
AccountScreen より子Viewは アカウント選択中のライフタイムと同じViewとなるので、Account Componentのインスタンスを親から子へ配っていきます。
struct AccountScreen: View {
    ...
    var body: some View {
        ...
        HomeScreen(component: component)
        ...
    }
}

struct HomeScreen: View {
    let component: AccountComponent
    ...
    init(component: AccountComponent) {
        self.component = component
        ...
    }
    ...
}
各画面で必要な依存は、その画面に対応するComponentから取得します。
struct HomeScreen: View {
    let component: AccountComponent
    let viewModel: HomeViewModel
    ...
    init(component: AccountComponent) {
        self.component = component
        self.viewModel = HomeViewModel(
            homeTimelineRepository: component.homeTimelineRepository,
            currentAccountRepository: component.currentAccountRepository
        )
    }
    ...
}
以上がSwiftUIのアプリにおけるDI Containerの具体的な実装例です。
まとめ
- Dependency Injectionは、抽象に対して実装が依存するように設計するためのパターンであり、テスト時などに実装を置き換えることを可能にする
- DI Containerは、登録された依存を返してくれるコンテナクラスであり、依存を組み立てるためのボイラープレートの削減と、ライフタイムごとのインスタンスの再利用を可能にする
本記事が少しでもみなさんの参考になりましたら幸いです。
本記事は株式会社スマートバンクのアプリエンジニアであるロクネムが執筆しました。
株式会社スマートバンクでは一緒に B/43 を作り上げていくメンバーを募集しています!カジュアル面談も受け付けていますので、お気軽にご応募ください 🙌
https://smartbank.co.jp/9167a8d73ada4dbca78312787636bc93smartbank.co.jp