こんにちは、株式会社スマートバンクでアプリエンジニアをしているロクネムです。
みなさんは、Annotation Processingをご存知でしょうか? Annotation Processingは、Javaにおけるコード生成の言語仕様で、これまでAndroidアプリ開発者の生産性を大きく向上させてきました。
iOSアプリ開発においても、Swift MacrosとSwift Syntaxを活用することにより、Annotation Processingのようなアノテーションベースのコード生成を再現できるようになりました。
本記事では、Swiftにおいてアノテーションに似た機能をどのように実現し、コードの自動生成によって生産性をどのように向上させることができるのかについて、実践的な内容をもとにご紹介します。
※ こちらの記事は、try! Swift Tokyo 2025にて発表させていただいたセッション『Unlock the Potential of Swift Code Generation』について、内容を書き起こしたものとなっております。
Code Generation in Android App Development
Swiftにおけるコード生成のお話に入る前に、より可能性の幅を膨らませるために、まずはAndroidアプリ開発におけるコード生成の活用事例を見ていいきたいと思います。
Androidアプリ開発においてコード生成を活用したライブラリとして、2つのライブラリを見ていきます。
いずれもAnnotation Processingの仕組みを通じてコード生成を実現しているライブラリです。

Room
1つ目はRoomです。RoomはSQLite全体に抽象化レイヤを提供することで、データベースへのより安定したアクセスを可能にするライブラリです。
例えば、UsersテーブルへのデータアクセスオブジェクトとしてこのようにUserDaoを定義するとします。
@Dao
interface UserDao {
  @Query("SELECT * FROM users")
  fun getAll(): List<User>
}
Annotation Processingでは、@Dao や @Query のようなアノテーションをコード中へ記述し、コンパイル時にアノテーションのついたコード周辺の構文木を解析することで、コード生成をしています。
生成されるコードはこのようになります。実際はもっと複雑ですがわかりやすさのために簡略化したものを表示しています。
// Generated code with simplified

class UserDao_Impl(private val __db: RoomDatabase) : UserDao {
  override fun getAll(): List<User> {
    val statement = RoomSQLiteQuery.acquire("SELECT * FROM users", 0)
      __db.assertNotSuspendingTransaction()
      return query(__db, statement, false, null).use { cursor ->
        mutableListOf<User>().apply {
          while (cursor.moveToNext()) {
            add(User(cursor.getInt(getColumnIndexOrThrow(cursor, "id"))))
          }
        }
      }.also { statement.release() }
  }
}
このようなデータベースアクセスの抽象化は、Apple Platformアプリの開発において使用されるSwiftDataにおいてもみることができます。
例えばSwiftDataを使用してUserモデルを記述したとしましょう。
import SwiftData

@Model
final class User {
  var name: String

  init(name: String) {
    self.name = name
  }
}
Swift Macrosで定義された @Model の生成するコードを展開すると、computed propertyとしてデータベースへアクセスするコードが生成されます。実際はもっと複雑ですがわかりやすさのために簡略化したものを表示しています。
// Generated code with simplified

final class User {
  var name: String {
    get {
      persistentBackingData.getValue(forKey: \.name)
    }
    set {
      persistentBackingData.setValue(
        forKey: \.name,
        to: newValue
      )
    }
  }

  var persistentBackingData: any BackingData<User> { ... }

  init(name: String) { … }

}
このように、Android開発におけるAnnotation Processingの仕組みはSwiftにおけるSwift Macrosの仕組みと非常に似た構造にあるということが伺えます。
Dagger
続いて、2つ目に挙げたDaggerについても見てみましょう。Daggerは依存性注入のためのコードをコンパイル時に自動生成する仕組みを提供しています。
Daggerのサンプルコードはこのようになります。
@Component
interface ApplicationComponent {
  fun inject(activity: LoginActivity)
}
class LoginActivity: Activity() {
  @Inject
  lateinit var loginViewModel: LoginViewModel
}
class LoginViewModel @Inject constructor(
  private val userRepository: UserRepository
) {}
class UserRepository @Inject constructor(
  private val localDataSource: UserLocalDataSource,
  private val remoteDataSource: UserRemoteDataSource
) {}
class UserLocalDataSource @Inject constructor() {}
class UserRemoteDataSource @Inject constructor() {}
ApplicationComponentをDI Containerのinterfaceとして定義し、そこへ @Component アノテーションを付与します。
そして、そのDI Containerへ登録する各依存のconstructorへ @Inject アノテーションを付与します。
コンパイルすると、ApplicationComponent interfaceを継承した DaggerApplicationComponent classが生成されます。実際はもっと複雑ですがわかりやすさのために簡略化したものを表示しています。
// Generated code with simplified

class DaggerApplicationComponent : ApplicationComponent {
  fun inject(activity: LoginActivity) {
    activity.loginViewModel = loginViewModel()
  }

  private fun loginViewModel() =
    LoginViewModel(userRepository())

  private fun userRepository() =
    UserRepository(
      UserLocalDataSource(),
      UserRemoteDataSource()
    )
}
DI ContainerにLoginViewModel等の依存が登録されており、簡単に依存を解決できるようになっています。
では、このDaggerのようなコード生成をSwift Macrosのみを使用して再現することはできるでしょうか?
答えは、できません。
Swift MacrosはMacroが宣言された周辺の構文木のみを処理するため、複数の型にまたがるグローバルなコードの生成はできないのです。
しかしこれはSwift Macros「のみ」を使用する場合に限ります。
Swift Macrosだけではなく、Swift Package pluginsと、Swift Syntaxを組み合わせると、複数の型にまたがるようなグローバルなコード生成も可能になります。
では、実際にどのような実装が必要になるのでしょうか?
Practical Example: Code Generation for DI Container
具体的な例として、DaggerのようなDI Containerのコード生成をSwiftで再現する場合を考えてみます。
ここから紹介するコードは、自分が開発しているSwordというDI Containerのライブラリにおける実装をかなり簡略化したものとなります。 詳細が気になる場合はぜひGitHub上でみてみてください。
実装方法についてみていく前に、まずはDI Containerを構築する対象となるプロジェクト構成の例についてみていきましょう。
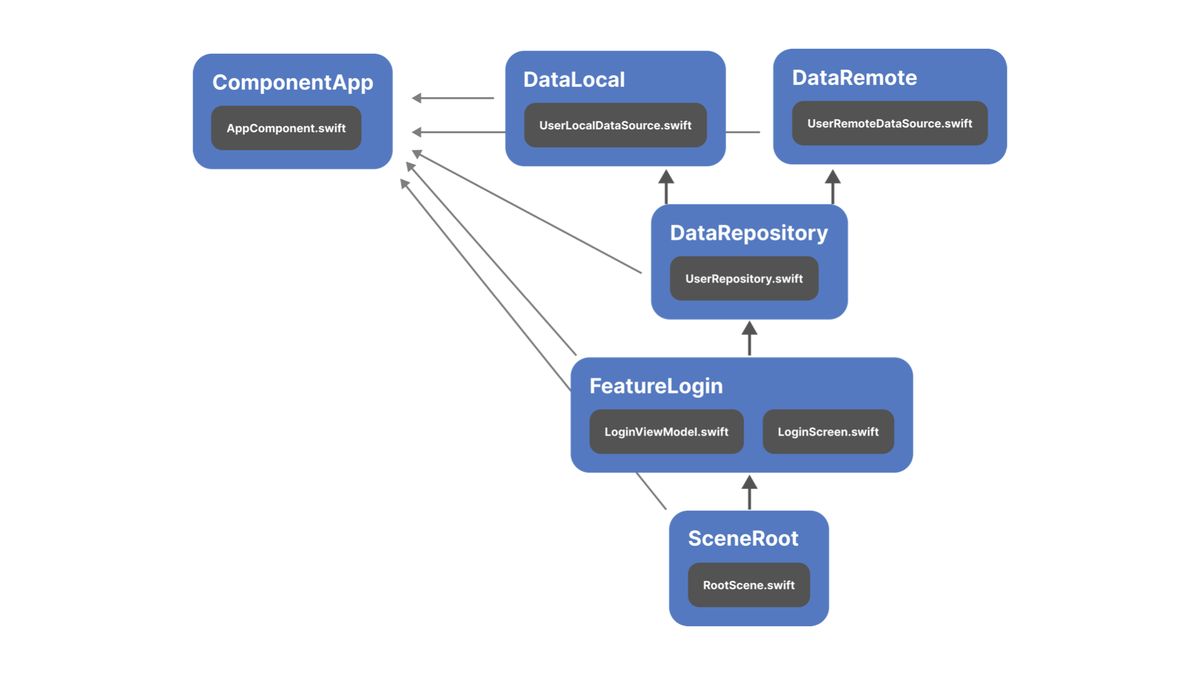
まず、ComponentAppモジュールにて、DI Containerとなる AppComponent が定義されています。
Daggerと同様に @Component がDI Containerに対して付与されることを想定します。
// ComponentApp/AppComponent.swift

@Component
final class AppComponent {
}
次に、DataLocalモジュールではUserLocalDataSourceの依存が定義されています。
この依存には @Dependency が付与され、AppComponentのDI Containerに登録されることが明示されています。
そして、initializerにはDaggerと同様に @Injected Macroが付与されています。
// DataLocal/UserLocalDataSource.swift

@Dependency(registeredTo: AppComponent.self)
struct UserLocalDataSource {
  @Injected
  init() {}
}
同様に、DataRemoteモジュールではUserRemoteDataSourceが依存として定義され、DataRepositoryモジュールではUserRepositoryが、FeatureLoginモジュールではLoginViewModelが依存として定義されています。
// DataLocal/UserRemoteDataSource.swift

@Dependency(registeredTo: AppComponent.self)
struct UserRemoteDataSource {
  @Injected
  init() {}
}

// DataRepository/UserRepository.swift

@Dependency(registeredTo: AppComponent.self)
struct UserRepository {
  private let localDataSource:
UserLocalDataSource
  private let remoteDataSource: UserRemoteDataSource

  @Injected
  init(
    localDataSource: UserLocalDataSource,
    remoteDataSource: UserRemoteDataSource
  ) { … }
}

// FeatureLogin/LoginViewModel.swift

@Dependency(registeredTo: AppComponent.self)
final class LoginViewModel {
  private let userRepository: UserRepository

  @Injected
  init(userRepository: UserRepository) {
    self.userRepository = userRepository
  }
}

// FeatureLogin/LoginScreen.swift

struct LoginScreen: View {
  let viewModel: LoginViewModel

  var body: some View { … }
}
そして、SceneRootモジュールではAppComponentのDI Containerを保持したRootSceneを定義しており、ここから各モジュールへ依存を注入していく形となっています。
// SceneRoot/RootScene.swift

struct RootScene: Scene {
  private let component = AppComponent()

  var body: some Scene {
    WindowGroup {
      ...
    }
  }
}
この構成のプロジェクトをビルドすると、AppComponntに対してextension経由で各依存が登録されているコードが生成されることを想定しています。
extension AppComponent {
  var userLocalDataSource: UserLocalDataSource {
    UserLocalDataSource()
  }
  var userRemoteDataSource: UserRemoteDataSource {
    UserRemoteDataSource()
  }
  var userRepository: UserRepository {
    UserRepository(
      localDataSource: self.userLocalDataSource,
      remoteDataSource: self.userRemoteDataSource
    )
  }
  var loginViewModel: LoginViewModel {
    LoginViewModel(userRepository: self.userRepository)
  }
}
ここからは、実際にこのようなコード生成の処理をどのように実装していくのかについてお話しさせていただきます。
実装には大きく5つのステップが必要となります。

Define Macros
まずは1つ目のステップ「Define Macros」からみていきましょう。
まずはComponent Macroの宣言部分を実装します。 Component protocolを定義し、それに準拠するようなExtensionMacroを宣言します。
public protocol Component: AnyObject {}

@attached(
  extension,
  conformances: Component
)
public macro Component() =
  #externalMacro(
    module: "SwordMacros",
    type: “ComponentMacro"
  )
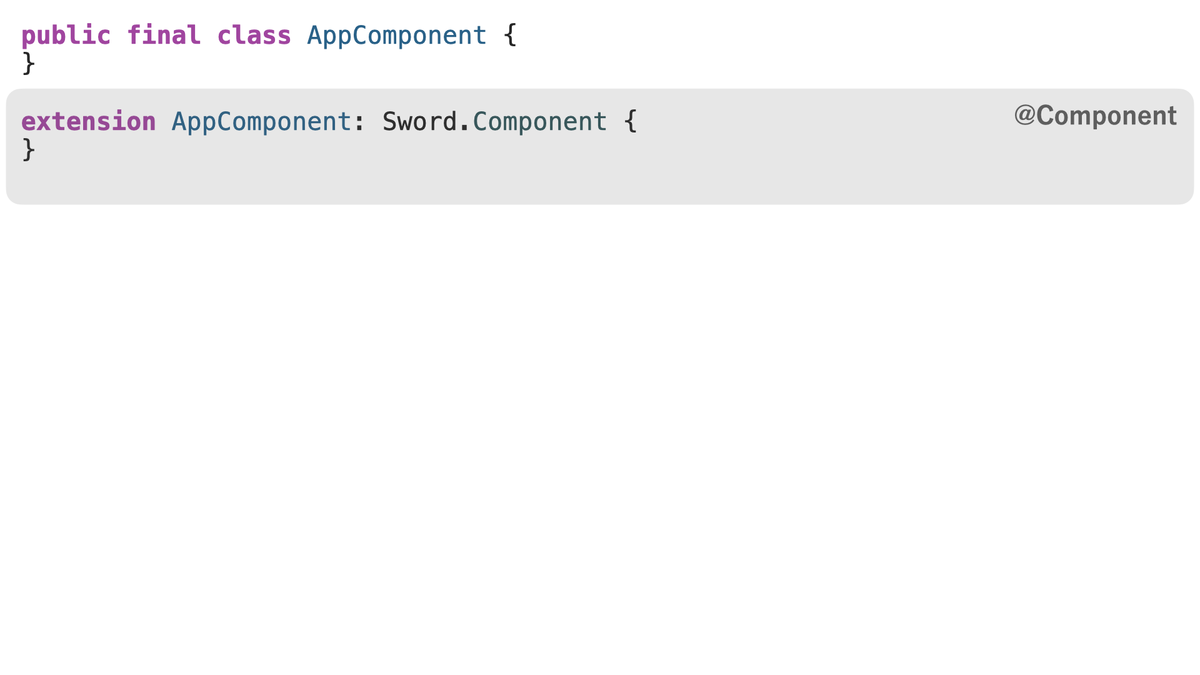
続いて宣言に対応する実装部分です。 extensionでComponent protocolに準拠するように実装していきます。
struct ComponentMacro: ExtensionMacro {
  static func expansion(
    of node: AttributeSyntax,
    attachedTo declaration: some DeclGroupSyntax,
    providingExtensionsOf type: some TypeSyntaxProtocol,
    conformingTo protocols: [TypeSyntax],
    in context: some MacroExpansionContext
  ) throws -> [ExtensionDeclSyntax] {
    let decl: DeclSyntax = """
      extension \(raw: type.trimmedDescription): Sword.Component {
      }
      """
    let extensionDecl = decl.cast(ExtensionDeclSyntax.self)
    return [extensionDecl]
  }
}
すると、@Componentを付与したコードは、このようにComponent protocolへ準拠するようにコードが展開されます。
Dependency Macroも同様に実装していきます。まずは宣言部分です。 Component protocolの型を引数として受け取るように定義し、PeerMacroとして宣言します。
@attached(peer)
public macro Dependency(
  registeredTo component: any Component.Type
) = #externalMacro(
  module: ”SwordMacros",
  type: “DependencyMacro"
)
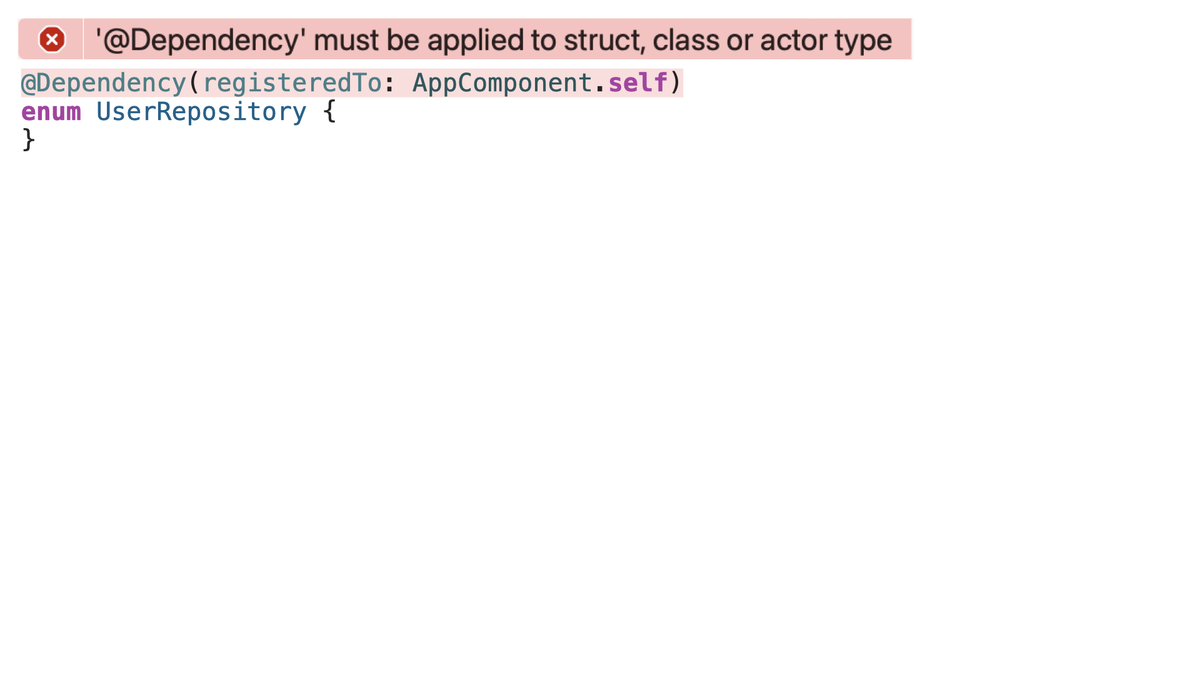
続いて宣言に対応する実装部分です。 ここでは、Dependency Macroがstruct, class, actorの宣言に対してのみ付与できるようにバリデーションロジックを書いており、特にコードは生成しません。
struct DependencyMacro: PeerMacro {
  static func expansion(
    of node: AttributeSyntax,
    providingPeersOf declaration: some DeclSyntaxProtocol,
    in context: some MacroExpansionContext
  ) throws -> [DeclSyntax] {
    guard
      declaration.is(StructDeclSyntax.self)
        || declaration.is(ClassDeclSyntax.self)
        || declaration.is(ActorDeclSyntax.self)
    else {
      throw DependencyError.invalidApplication
    }

    return []
  }
}
もし例えばenumのような対象外の宣言に対して@Dependencyを付与すると、このようにエラーを表示します。
今回、Swift Macrosはあくまでグローバルなコードを生成する上でのアノテーションとして定義するため、何もコードを生成しない形で実装することもあります。
Injected MacroについてもDependency Macroと同様で、initializer以外に付与されている場合にエラーを表示するように実装します。
@attached(peer)
public macro Injected() = #externalMacro(
  module: "SwordMacros",
  type: “InjectedMacro"
)

struct InjectedMacro: PeerMacro {
  static func expansion(
    of node: AttributeSyntax,
    providingPeersOf declaration: some DeclSyntaxProtocol,
    in context: some MacroExpansionContext
  ) throws -> [DeclSyntax] {
    guard declaration.is(InitializerDeclSyntax.self) else {
        throw InjectedError.invalidApplication
    }

    return []
  }
}
以上が一つ目のステップ「Define Macros」でした。
Configure Plugin
続いて2つ目のステップ「Configure Plugin」についてみていきましょう。 ステップ1で定義したAnnotationとしてのMacroを毎ビルド処理してコードを生成する仕組みを構築するために、Swift Package pluginsのBuildToolPluginを実装していきます。
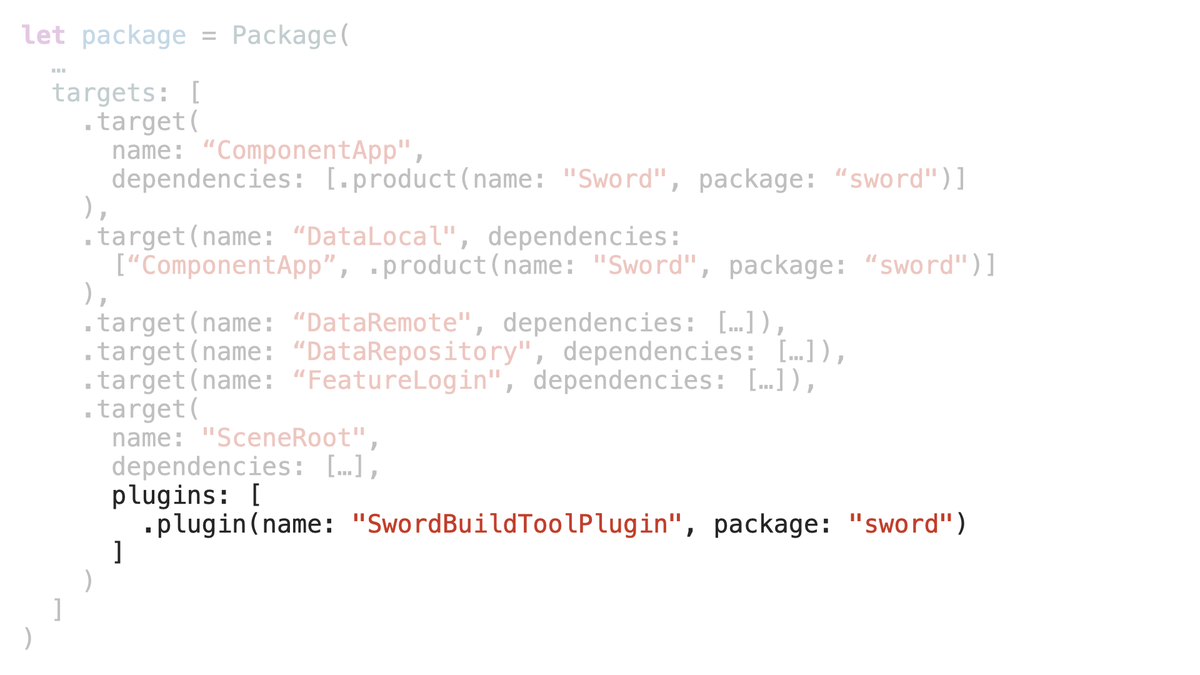
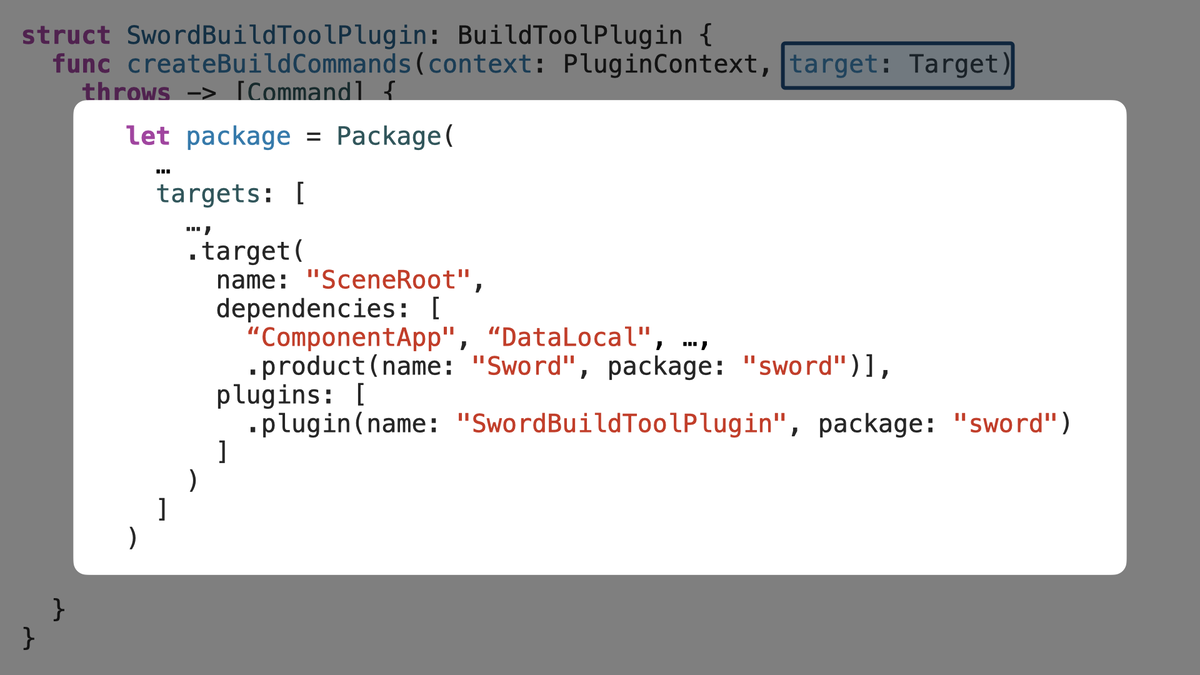
前提として、DI Containerを構築したいSwift Packageがこのような構成になっている場合、このように一番親のモジュールにてBuildToolPluginを使用することを想定しています。
それでは、BuildToolPluginの実装についてみていきましょう。
まず、 createBuildCommands メソッドの Target 引数に注目します。
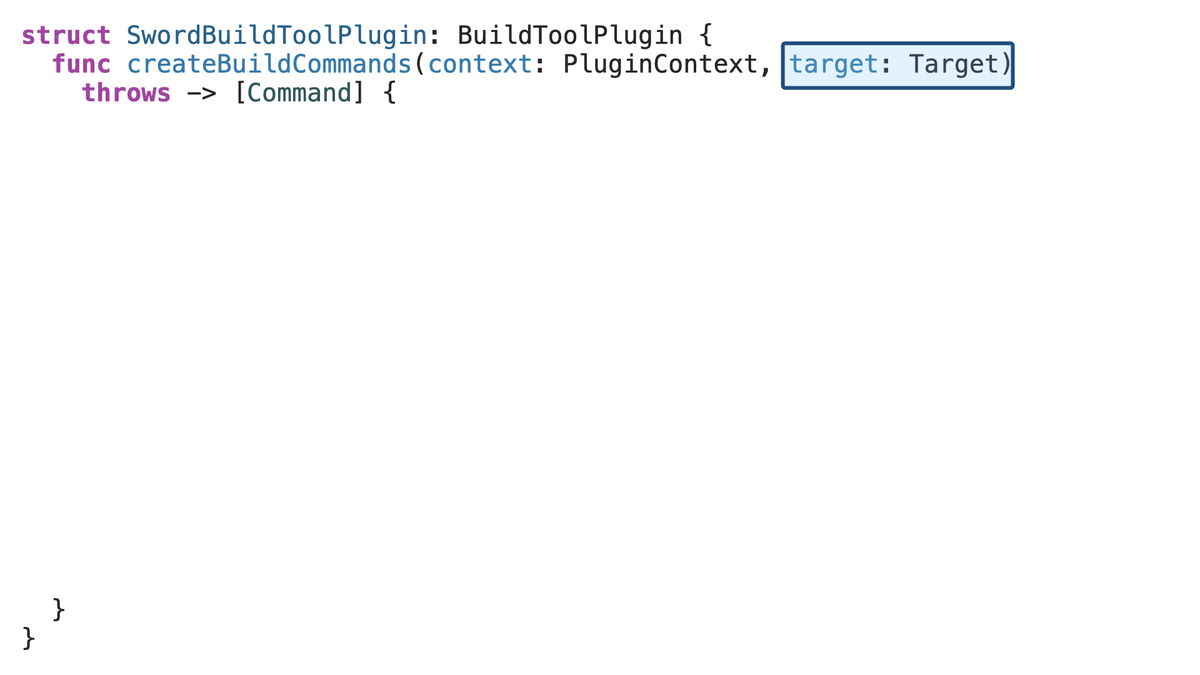
このTargetはPackage.swiftのtargetの定義に対応しています。
今回コードを生成するにあたって、Pluginが追加されているモジュール、およびそのモジュールが依存している先のモジュールの情報を再起的に収集していく必要があります。
なので、そのようなメソッドとして recursiveSamePackageDependencies メソッドを実装していきます。
struct SwordBuildToolPlugin: BuildToolPlugin {
  ...

  private func recursiveSamePackageDependencies(for target: Target)
    -> [Target] {

  }
}
まずは対象となるTargetがソースファイルを含むモジュールであるかどうかを、 Target.sourceModule の有無で確認します。
 struct SwordBuildToolPlugin: BuildToolPlugin {
   ...

   private func recursiveSamePackageDependencies(for target: Target)
     -> [Target] {
     guard
+      let sourceModule = target.sourceModule,
   }
 }
次に、モジュールの種類がtestやexecutable, macroでないことを確認します。
 struct SwordBuildToolPlugin: BuildToolPlugin {
   ...
   private func recursiveSamePackageDependencies(for target: Target)
     -> [Target] {
     guard
       let sourceModule = target.sourceModule,
+      case .generic = sourceModule.kind
+    else { return [] }

   }
 }
そして、依存先の各モジュールのうち、同一Package内で定義されたモジュールに対してのみ、さらに再起的に依存先のモジュールを辿っていきます。
 struct SwordBuildToolPlugin: BuildToolPlugin {
   ...
   private func recursiveSamePackageDependencies(for target: Target)
     -> [Target] {
     guard
       let sourceModule = target.sourceModule,
       case .generic = sourceModule.kind
     else { return [] }

+    return sourceModule.dependencies.reduce([target]) { result, dependency in
+      switch dependency {
+      case .target(let dependencyTarget):
+        result + recursiveSamePackageDependencies(for: dependencyTarget)
+      case .product: result
+      @unknown default: result
+      }
+    }
   }
 }
ここまでで、Pluginが追加されたモジュールの依存しているモジュールすべてを取得できました。
この依存モジュールのdirectory一覧をinputとして定義し、 pluginWorkDirectoryURL に対して適当なファイル名をappendしたpathをコード生成先のoutputとして定義します。
 struct SwordBuildToolPlugin: BuildToolPlugin {
   func createBuildCommands(context: PluginContext, target: Target)
     throws -> [Command] {
     let dependencies = recursiveSamePackageDependencies(for: target)
+    let currentDirectory = context.package.directoryURL.path()
+    let inputDirectories = dependencies.map { dependency in
+      dependency.directory.string.replacingOccurrences(
+        of: currentDirectory, with: ""
+      )
+    }
+    let output = context.pluginWorkDirectoryURL.appending(
+      path: “Sword.generated.swift"
+    )

   }
 }
このinputとoutputをexecutableTargetへ引数として渡し、コード生成の処理を委譲します。
 struct SwordBuildToolPlugin: BuildToolPlugin {
   func createBuildCommands(context: PluginContext, target: Target)
     throws -> [Command] {
     let dependencies = recursiveSamePackageDependencies(for: target)
     let currentDirectory = context.package.directoryURL.path()
     let inputDirectories = dependencies.map { dependency in
       dependency.directory.string.replacingOccurrences(
         of: currentDirectory, with: ""
       )
     }
     let output = context.pluginWorkDirectoryURL.appending(
       path: “Sword.generated.swift"
     )
+    return [.buildCommand(
+      displayName: "Run SwordCommand",
+      executable: try context.tool(named: "SwordCommand").url,
+      arguments: ["--inputs"] + inputDirectories +
+        ["--output", output.relativePath],
+      outputFiles: [output]
+    )]
+  }
 }
委譲されたCommand側はArgumentParserを使用してinput, outputを引数として受け取ります。 このCommandのrunメソッドがビルド毎に毎回呼ばれるようになり、ここにコード生成処理を実装していくことになります。
struct SwordCommand: ParsableCommand {
  @Option(parsing: .upToNextOption)
  var inputs: [String] = []
  @Option
  var output: String

  mutating func run() throws {
  }
}
今回はSwift Packageを中心としたプロジェクト構成を例としていましたが、もちろんXcodeBuildToolPluginを実装すればXcode Projectsにも対応することは可能です。
以上が2つ目のステップ「Configure Plugin」でした。
Parse
続いて3つ目のステップ「Parse」についてみていきましょう。 ステップ2にて構築したPluginから取得したinputを元に、ソースコードを解析していきます。
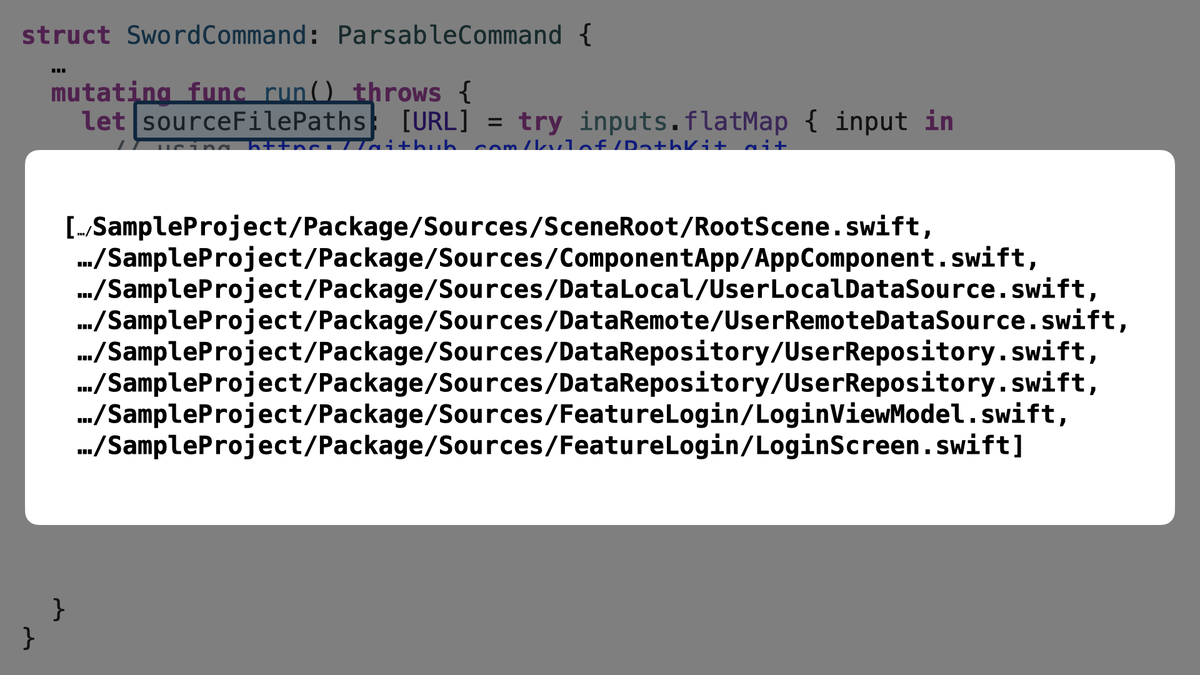
まず、現在このCommandのinputsには、ソースファイルを保持する各ディレクトリの情報が格納されているので、各ディレクトリ配下にある全てのSwiftファイルへのpathをPathKitを使用して収集していきます。
struct SwordCommand: ParsableCommand {
  …
  mutating func run() throws {
    let sourceFilePaths: [URL] = try inputs.flatMap { input in
      // using https://github.com/kylef/PathKit.git
      try Path(input).recursiveChildren().compactMap { child in
        guard child.extension == "swift" else { return nil }

        return child.absolute().url
      }
    }

  }
}
これにより、今 sourceFilePaths には、このようにすべてのSwiftファイルのpathが格納されています。
次に、このSwiftファイルから構文木の情報をパースしていきます。
Swiftファイルのpathからソースコードを取得し、SwiftSyntaxフレームワークのSwiftParserを使用して構文木を取得します。
struct SwordCommand: ParsableCommand {
  …
  mutating func run() throws {
    let sourceFilePaths: [URL] = …
    let sourceFileSyntaxes = try sourceFilePaths.map { sourceFilePath in
      let source = try String(contentsOf: sourceFilePath, encoding: .utf8)
      return SwiftParser.Parser.parse(source: source)
    }

  }
}
するとこのような構文木が得られます。こちらの構文木はAppComponentに対応する構文木です。
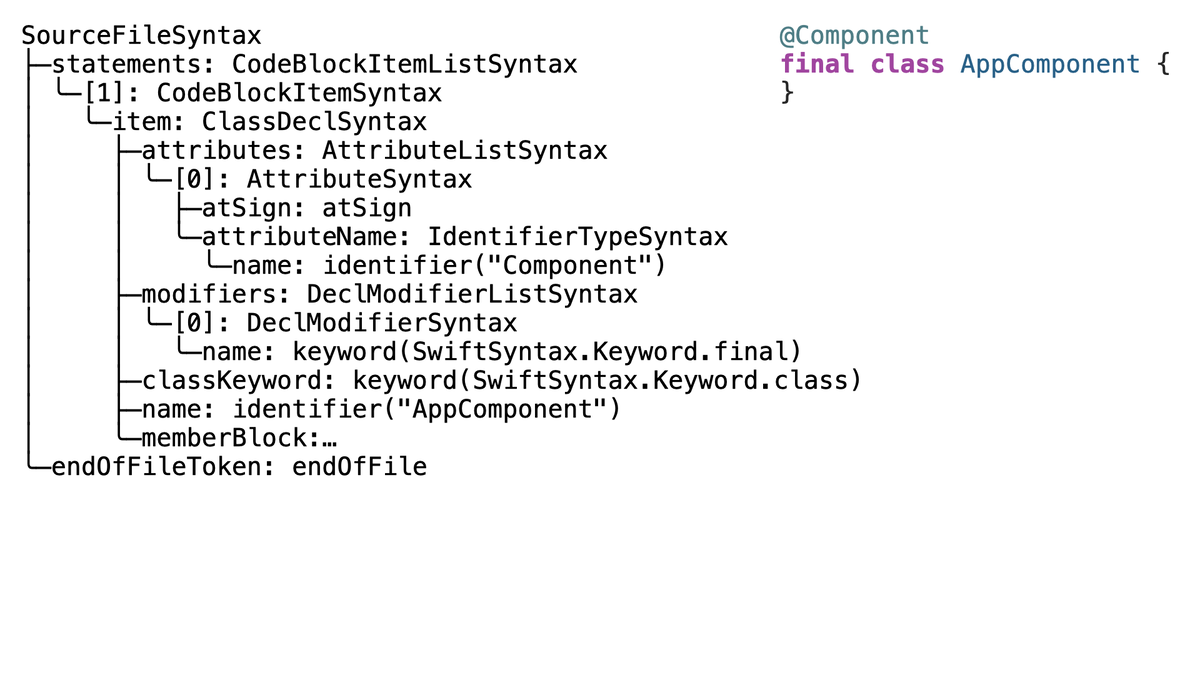
例えば、 attributes が @Component に対応しており、 name が AppComponent というクラス名に対応しています。
このように得られた構文木を探索しながら、ComponentやDependencyの情報を収集していきます。
まずはComponentの情報を表す ComponentDescriptor を用意します。
struct ComponentDescriptor {
  let name: String
}
次に、 ComponentDescriptor を収集する ComponentVisitor を実装していきます。
final class ComponentVisitor: SyntaxVisitor {
  var results = [ComponentDescriptor]()

  override func visit(_ node: ClassDeclSyntax) -> SyntaxVisitorContinueKind {

  }
}
ComponentVisitor はSwiftSyntaxフレームワークの提供するSyntaxVisitorを継承したclassです。SyntaxVisitorは構文木を探索するclassで、対象のノードのvisitメソッドをオーバーライドすることでそのノードを処理することができます。
今回は @Component Macroの付与されたclassの情報を収集したいので、 ClassDeclSyntax のvisitメソッドをオーバーライドします。
このvisitメソッドの引数nodeには、このような構文木の情報が格納されています。
ClassDeclSyntax
├─attributes: AttributeListSyntax
│ ╰─[0]: AttributeSyntax
│   ├─atSign: atSign
│   ╰─attributeName: IdentifierTypeSyntax
│     ╰─name: identifier("Component")
├─modifiers: DeclModifierListSyntax
│ ╰─[0]: DeclModifierSyntax
│   ╰─name: keyword(SwiftSyntax.Keyword.final)
├─classKeyword: keyword(SwiftSyntax.Keyword.class)
├─name: identifier("AppComponent")
╰─memberBlock:…
まずは、 attribute の name が Component であるかどうかを検証していきます。
実装はこのようになります。
final class ComponentVisitor: SyntaxVisitor {
  var results = [ComponentDescriptor]()

  override func visit(_ node: ClassDeclSyntax) -> SyntaxVisitorContinueKind {
    let componentAttribute = node.attributes.first { attribute in
      guard
        let attribute = attribute.as(AttributeSyntax.self),
        let attributeName =
          attribute.attributeName.as(IdentifierTypeSyntax.self)
      else { return false }

      return attributeName.name.text == "Component"
    }
  }
}
想定する型に各 attribute をキャストしながら、nameが Component である attribute を抽出しています。
このような任意の名前のMacroに対応するattributeを取得する処理は、後にDependency Macroの情報を収集する際にも再利用するため、別メソッドへ切り出します。
 final class ComponentVisitor: SyntaxVisitor {
   var results = [ComponentDescriptor]()

   override func visit(_ node: ClassDeclSyntax) -> SyntaxVisitorContinueKind {
+    let componentAttribute = node.attributes.first(named: “Component")

   }
 }

+extension AttributeListSyntax {
+  func first(named name: String) -> AttributeSyntax? {
+    self.first { attribute in
+      guard
+        let attribute = attribute.as(AttributeSyntax.self),
+        let attributeName =
+          attribute.attributeName.as(IdentifierTypeSyntax.self)
+      else { return false }
+
+      return attributeName.name.text == name
+    }?.as(AttributeSyntax.self)
+  }
+}
次に、取得した componentAttribute がnilでないことを検証します。
final class ComponentVisitor: SyntaxVisitor {
  var results = [ComponentDescriptor]()

  override func visit(_ node: ClassDeclSyntax) -> SyntaxVisitorContinueKind {
    let componentAttribute = node.attributes.first(named: "Component")
    guard componentAttribute != nil else {
      return .skipChildren
    }

  }
}
最後に、Component Macroが付与されたclassの名前を取得したいので、 node.name.text から取得し、ComponentDescriptorを初期化して結果として保持します。
final class ComponentVisitor: SyntaxVisitor {
  var results = [ComponentDescriptor]()

  override func visit(_ node: ClassDeclSyntax) -> SyntaxVisitorContinueKind {
    let componentAttribute = node.attributes.first(named: "Component")
    guard componentAttribute != nil else {
      return .skipChildren
    }

    results.append(ComponentDescriptor(name: node.name.text))
    return .skipChildren
  }
}
Commandの実装へ戻り、取得したSwiftファイルの構文木をComponentVisitorで走査していきます。
struct SwordCommand: ParsableCommand {
  …
  mutating func run() throws {
    …
    let sourceFileSyntaxes = …
    var componentDescriptors = [ComponentDescriptor]()
    for sourceFileSyntax in sourceFileSyntaxes {
      let componentVisitor = ComponentVisitor(viewMode: .sourceAccurate)
      componentVisitor.walk(sourceFileSyntax)
      componentDescriptors.append(contentsOf: componentVisitor.results)
    }

  }
}
これにより、Component Macroの付与されたclassの情報を取得することができます。
同様にDependencyVisitorも実装します。
struct SwordCommand: ParsableCommand {
  …
  mutating func run() throws {
    …
    let sourceFileSyntaxes = …
    var componentDescriptors = [ComponentDescriptor]()
    var dependencyDescriptors = [DependencyDescriptor]()
    for sourceFileSyntax in sourceFileSyntaxes {
      let componentVisitor = ComponentVisitor(viewMode: .sourceAccurate)
      componentVisitor.walk(sourceFileSyntax)
      componentDescriptors.append(contentsOf: componentVisitor.results)
      let dependencyVisitor = DependencyVisitor(viewMode: .sourceAccurate)
      dependencyVisitor.walk(sourceFileSyntax)
      dependencyDescriptors.append(contentsOf: dependencyVisitor.results)
    }

  }
}
以上が3つ目のステップ「Parse」でした。
Validate
続いて4つ目のステップ「Validate」についてみていきましょう。
ステップ3で収集した ComponentDescriptor , DependencyDescriptor に対してvalidationをかけていきます。
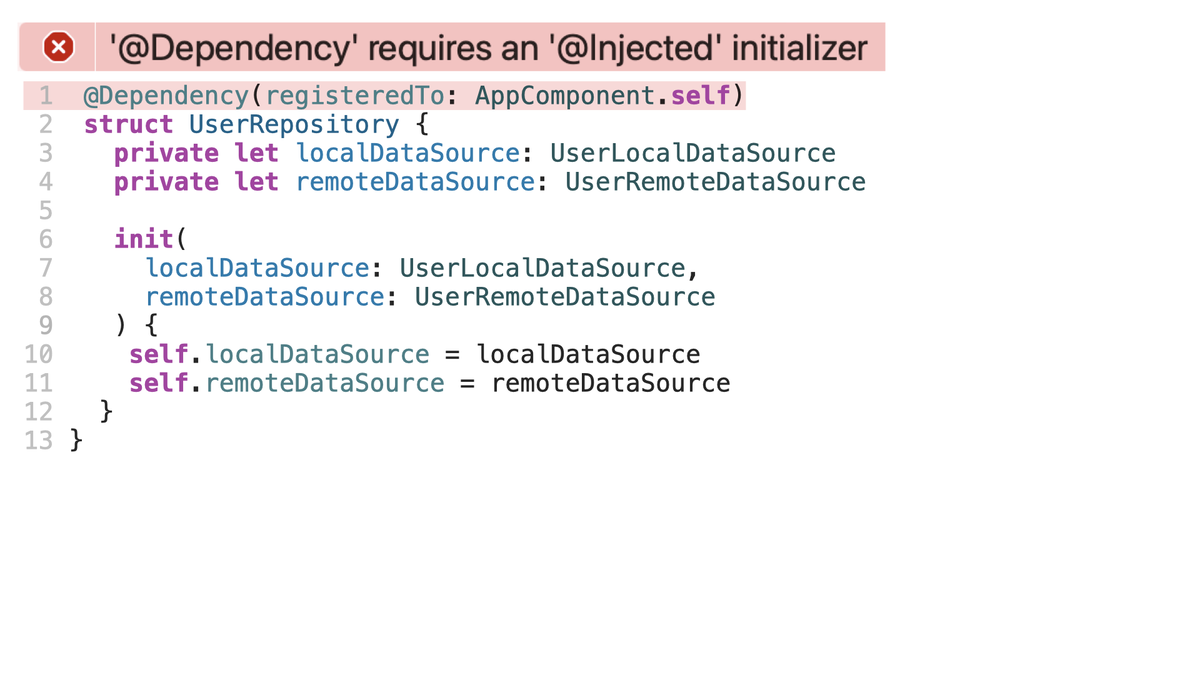
例えば、 @Dependency が付与された依存において、initializerに @Injected が付与されていない場合、このようにエラーを表示してあげたいとします。
エラーを表示するためには、標準出力に対してこのように書き込んであげる必要があります。
let file = ".../UserRepository.swift"
let line = 1
let column = 1
let severity = "error" // or “warning"
let message = "'@Dependency' requires an '@Injected' initializer"

FileHandle.standardOutput.write(
  Data(“\(file):\(line):\(column): \(severity): \(message)”.utf8)
)
どのファイルの、どの行の、どのカラムに、エラーあるいはワーニングを表示するかどうかを指定して、メッセージを表示することが可能です。
このようにどこにメッセージを表示するかを指定するためには、エラーのあるソースコードの位置を把握する必要があります。
そのために、DescriptorにSourceLocationのpropertyを追加します。
 struct DependencyDescriptor {
   struct Initializer {
     struct Parameter {
       let type: String
       let name: String
     }

     let parameters: [Parameter]
   }

   let componentName: String
   let type: String
   let injectedInitializers: [Initializer]
+  let location: SourceLocation
 }
そして、Visitor側で、 SourceLocationConverter を保持するようにして、対象nodeからこのように SourceLocation を取得します。
 final class DependencyVisitor: SyntaxVisitor {
   …
+  private let locationConverter: SourceLocationConverter

   init(locationConverter: SourceLocationConverter) {
     self.locationConverter = locationConverter
     super.init(viewMode: .sourceAccurate)
   }

   override func visit(_ node: StructDeclSyntax) -> SyntaxVisitorContinueKind {
     …
     let dependencyDescriptor = DependencyDescriptor(
       componentName: componentArgument.baseName.text,
       type: node.name.text,
       injectedInitializers: injectedInitializers,
+      location: node.attributes.startLocation(converter: locationConverter)
     )
     results.append(dependencyDescriptor)
     return .skipChildren
   }
 }
Commandの実装へ戻り、Descriptorを検証しながら正規化されたModelへmappingする処理を書いていきます。
struct SwordCommand: ParsableCommand {
  …
  mutating func run() throws {
    …
    let dependencies = try dependencyDescriptors.compactMap { descriptor in
      guard let initializer = descriptor.injectedInitializers.first else {
        return nil
      }

      return Dependency(
        type: descriptor.type,
        componentName: descriptor.componentName,
        initializer: initializer
      )
    }
  }
}
その際、もし@Injectedが付与されたinitializerが存在しない場合は、このようにエラーを出力します。
 struct SwordCommand: ParsableCommand {
   …
   mutating func run() throws {
     …
     let dependencies = try dependencyDescriptors.compactMap { descriptor in
       guard let initializer = descriptor.injectedInitializers.first else {
+        let location = descriptor.location
+        try FileHandle.standardOutput.write(contentsOf: Data(
+          "\(location.file):\(location.line):\(location.column):
+           error: '@Dependency' requires an '@Injected' initializer".utf8
+        ))
         return nil
       }

       return Dependency(
         type: descriptor.type,
         componentName: descriptor.componentName,
         initializer: initializer
       )
     }
   }
 }
ComponentDescriptorにおいても同様の処理を記述してあげます。
struct SwordCommand: ParsableCommand {
  …
  mutating func run() throws {
    …
    guard let componentDescriptor = componentDescriptors.first else {
      try FileHandle.standardOutput.write(contentsOf: Data(
        "warning: '@Component' must be declared".utf8
      ))
      return
    }

    let component = Component(name: componentDescriptor.name)

  }
}
以上が4つ目のステップ「Validate」でした。
Generate Code
最後に5つ目のステップ「Generate Code」についてみていきましょう。 ここまでのステップで抽出してきた情報を元にコードを生成していきます。
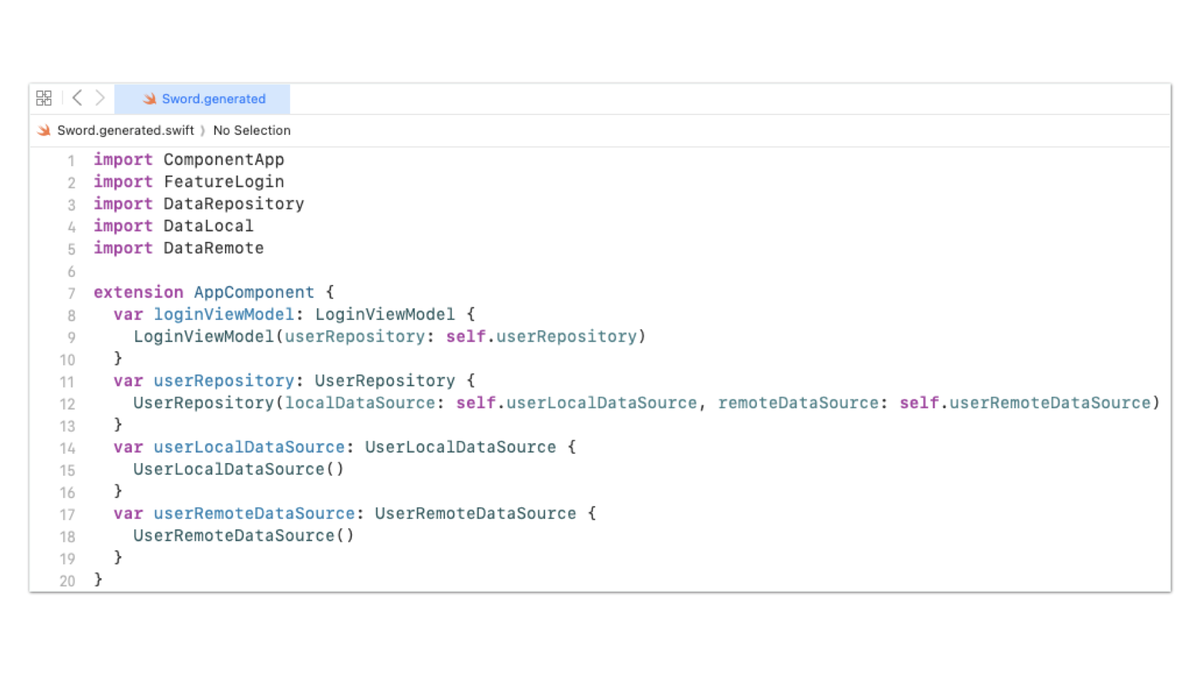
最終的にはこのようなコードを生成したいのですが、
// Sword.generated.swift

extension AppComponent {
  var userLocalDataSource: UserLocalDataSource {
    UserLocalDataSource()
  }
  var userRemoteDataSource: UserRemoteDataSource {
    UserRemoteDataSource()
  }
  var userRepository: UserRepository {
    UserRepository(localDataSource: self.userLocalDataSource, remoteDataSource: self.userRemoteDataSource)
  }
  var loginViewModel: LoginViewModel {
    LoginViewModel(userRepository: self.userRepository)
  }
}
Stringのみで生成しようとすると、このようにかなり可読性の低いコードとなります。
// using only String

var output = "extension \(component.name) {"
output += "\n"
for dependency in dependencies {
  output.append("  var \(dependency.key): \(dependency.type) {")
  output.append("\n")
  var dependencyGetter = ""
  dependencyGetter.append("    \(dependency.type)")
  dependencyGetter.append("(")
  for (i, parameter) in dependency.initializer.parameters.enumerated() {
    dependencyGetter.append("\(parameter.name): self.\(parameter.type)")
    if i < dependency.initializer.parameters.count - 1 {
      dependencyGetter.append(", ")
    }
  }
  dependencyGetter.append(")")
  output.append(dependencyGetter)
  output.append("\n")
  output.append("  }")
  output.append("\n")
}
特に改行やインデントの調整は非常に手間のかかる作業で、拡張性を損ないます。
コード生成する際にはSwiftSyntaxフレームワークのSwiftSyntaxBuilderを活用すると、ResultBuilderを用いてより直感的で可読性・拡張性の高い実装を実現することができます。
今回生成するコードはこのような構文木を形成しています。
CodeBlockItemListSyntax
╰─[0]: CodeBlockItemSyntax
  ╰─item: ExtensionDeclSyntax
    ├─…
    ├─extendedType: IdentifierTypeSyntax
    │ ╰─name: identifier("AppComponent")
    ╰─memberBlock: MemberBlockSyntax
      ├─leftBrace: leftBrace
      ├─members: MemberBlockItemListSyntax
      │ ╰─[1]: MemberBlockItemSyntax
      │   ╰─decl: VariableDeclSyntax
      │     ├─…
      │     ╰─bindings: PatternBindingListSyntax
      │       ╰─[0]: PatternBindingSyntax
      │         ├─pattern: IdentifierPatternSyntax
      │         │ ╰─identifier: identifier("userRemoteDataSource")
      │         ╰─…
      ╰─rightBrace: rightBrace
SwiftSyntaxBuilderを使用すると、このように構文木と対応した実装をすることが可能です。
// using SwiftSyntaxBuilder

CodeBlockItemListSyntax(itemsBuilder: {
  ExtensionDeclSyntax(
    extendedType: IdentifierTypeSyntax(name: .identifier(component.name)),
    memberBlockBuilder: {
      for dependency in dependencies {
        VariableDeclSyntax(bindingSpecifier: .keyword(.var)) {
          PatternBindingSyntax(
            pattern: IdentifierPatternSyntax(
            identifier: .identifier(dependency.key.value)),
            typeAnnotation: TypeAnnotationSyntax(
              type: IdentifierTypeSyntax(
              name: .identifier(dependency.type)
            )
          ),
          accessorBlock: AccessorBlockSyntax(accessors: .getter(…))
        )
      }
    }
  )
})
このような構文木を構築する実装をComanndにてrenderメソッドとして定義します。
 struct SwordCommand: ParsableCommand {
   …
   @Option
   var output: String

   mutating func run() throws {
     …
+    let renderResult = render(component, dependencies)

   }

+  private func render(_ component: Component, _ dependencies: [Dependency])
+    -> CodeBlockItemListSyntax {
+    CodeBlockItemListSyntax { … }
+  }
 }
そして、構築した構文木を文字列へ変換します。
 struct SwordCommand: ParsableCommand {
   …
   @Option
   var output: String

   mutating func run() throws {
     …
+    let renderResult = render(component, dependencies)
+    var renderResultOutput = ""
+    renderResult.formatted().write(to: &renderResultOutput)

  }

   private func render(_ component: Component, _ dependencies: [Dependency])
     -> CodeBlockItemListSyntax {
     CodeBlockItemListSyntax { … }
   }
 }
このとき、 renderResult に対して formatted() メソッドを呼び出すことにより、空白や改行を基本的なフォーマットに則る形で調整することができます。
最後に、得られた文字列を output で受け取ったpathに対して書き込みます。
 struct SwordCommand: ParsableCommand {
   …
   @Option
   var output: String

   mutating func run() throws {
     …
     let renderResult = render(component, dependencies)
     var renderResultOutput = ""
     renderResult.formatted().write(to: &renderResultOutput)
+    try renderResultOutput.data(using: .utf8)?.write(
+      to: URL(filePath: output),
+      options: .atomic
+    )
   }

   private func render(_ component: Component, _ dependencies: [Dependency])
     -> CodeBlockItemListSyntax {
     CodeBlockItemListSyntax { … }
   }
 }
以上が5つ目のステップ「Generate Code」でした。
この状態でサンプルプロジェクトをビルドしてみましょう。
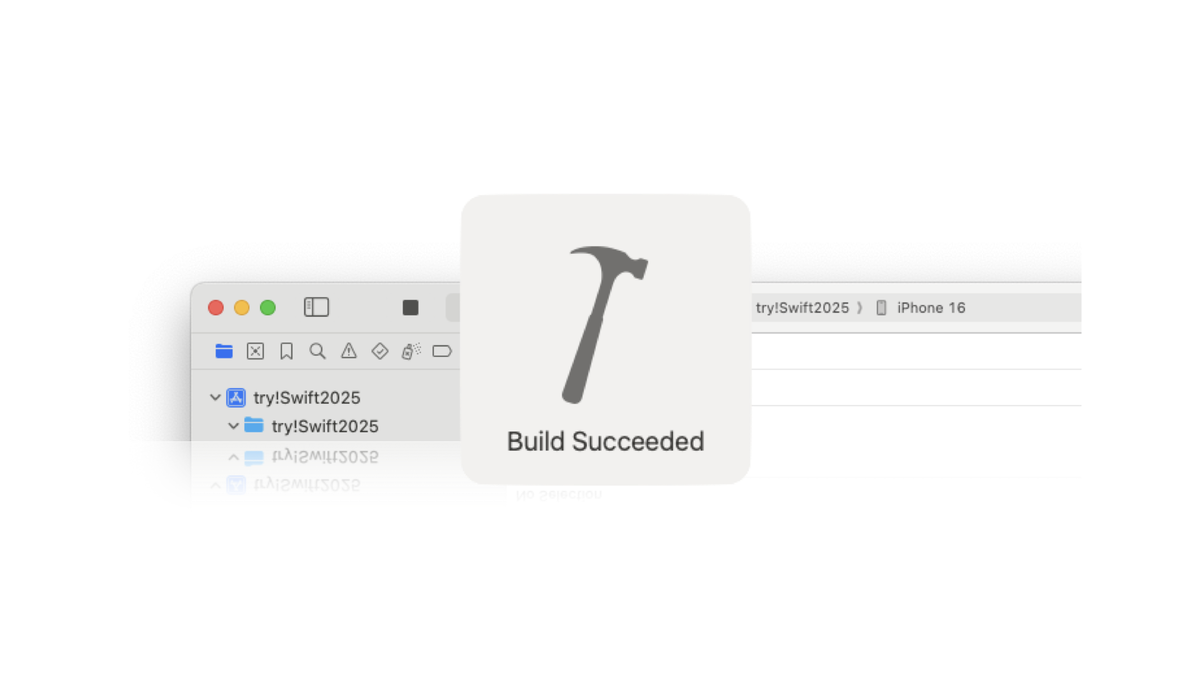
ビルドが成功すると、このように、各ファイルにて定義された依存の登録されたDI Containerを生成することができました。
Wrap up
- Swift Macrosをアノテーションとして定義することで、コンパイラはロジックを展開する場所を知ることができます
- BuildToolPluginを構築し、コード生成がビルドごとに実行されるようにします
- SwiftParserを使って.swiftファイルを解析し、SyntaxVisitorを使って構文木を走査し、アノテーションを見つけます
- Swift Macrosの使われ方を検証し、必要であれば SourceLocation をもとにエラーや警告を報告します
- 最後に、きれいで構造化された出力のために SwiftSyntaxBuilder を使って新しいソースファイルを作成します
本記事が、Swiftでより保守性の高いアプリケーションを構築できるようにするための全く新しいライブラリやツールの発明のきっかけにつながれば幸いです。
株式会社スマートバンクでは一緒に ワンバンク を作り上げていくメンバーを募集しています!カジュアル面談も受け付けていますので、お気軽にご応募ください 🙌